<?xml version="1.0" encoding="utf-8"?><feed xmlns="http://www.w3.org/2005/Atom"><title>干徒的博客</title><link href="https://ganto.me"/><id>https://ganto.me</id><link rel="self" href="https://ganto.me/static/atom.xml"/>
<updated>2026-01-29T00:00:00+08:00</updated>
<author><name>干徒</name></author>
<generator uri="https://ganto.me">website-rs</generator>
<entry>
  <title>人工智能（AI）基础解析</title>
  <link href="https://ganto.me/post/20260129"/>
  <id>https://ganto.me/post/20260129</id>
  <updated>2026-01-29T00:00:00+08:00</updated>
  <published>2026-01-29T00:00:00+08:00</published>
  <author><name>干徒</name></author>
  <summary><![CDATA[人工智能（AI）已经越来越融入我们的生活，从智能助手到智能机器人，从智能交通到智能医疗，AI正在改变我们的世界。]]></summary>
  <content type="html"><![CDATA[<h2>一、AI的定义</h2>
<p>人工智能（Artificial Intelligence，简称AI）是一门研究、开发用于<strong>模拟、延伸和扩展人类智能</strong>的理论、方法、技术及应用系统的技术科学，核心目标是让机器具备类似人类的感知、推理、学习、决策、创造等智能行为，能够自主处理问题并适应不同场景。</p>
<p>AI并非单一技术，而是一门交叉学科，融合了计算机科学、数学、统计学、神经科学、语言学、心理学等多个领域的知识，是现代科技发展的核心方向之一。</p>
<h2>二、AI的核心特征</h2>
<ol>
<li><strong>感知能力</strong>：机器通过传感器、算法识别和接收外界信息，如视觉（图像识别、计算机视觉）、听觉（语音识别）、触觉（传感器感知）等，模拟人类的五官感知。</li>
<li><strong>学习能力</strong>：机器从数据、经验中自动总结规律，优化自身性能，无需人工手动修改代码，是AI的核心能力之一，也是实现智能的基础。</li>
<li><strong>推理与决策能力</strong>：机器根据已学知识和感知到的信息，进行逻辑分析、归纳演绎，进而做出判断和决策，解决实际问题。</li>
<li><strong>自适应能力</strong>：面对不同的输入、环境变化，机器能调整自身的算法和策略，保持处理问题的有效性，如智能机器人适应不同的行走场景。</li>
<li><strong>交互能力</strong>：通过自然语言处理、情感识别等技术，实现机器与人类、机器与机器之间的高效沟通，如智能音箱、聊天机器人。</li>
</ol>
<h2>三、AI的主要分类</h2>
<p>从<strong>智能程度</strong>和<strong>应用场景</strong>出发，AI可分为三大类，也是行业内公认的分类方式，三者代表了AI发展的不同阶段：</p>
<h3>1. 弱人工智能（Narrow AI）</h3>
<p>也叫<strong>专用人工智能</strong>，是目前技术发展的主流，指仅能在<strong>特定领域</strong>完成单一任务的AI，其智能局限于预设的场景和任务范围，不具备通用的自主思考能力。<br />
<strong>典型应用</strong>：人脸识别、语音助手（Siri、小爱同学）、推荐算法（电商/视频平台）、自动驾驶（L2-L4级）、ChatGPT等大语言模型、图像生成工具（Midjourney、Stable Diffusion）。</p>
<h3>2. 强人工智能（General AI）</h3>
<p>也叫<strong>通用人工智能</strong>，是理想中的AI形态，指具备与<strong>人类同等水平</strong>的通用智能，能够理解、学习人类可掌握的任何知识和技能，在任意领域完成复杂任务，拥有自主意识、情感和独立思考能力，能像人类一样适应不同的未知场景。<br />
目前强人工智能仍处于理论研究阶段，尚未实现。</p>
<h3>3. 超人工智能（Super AI）</h3>
<p>指在<strong>所有领域</strong>的智能表现都远超人类的AI，不仅具备人类的智能和意识，还能在科学研究、创造、决策等方面做出超越人类极限的判断和成果。<br />
超人工智能属于未来的假想形态，其发展可能性和潜在影响仍是学术界的探讨话题。</p>
<h2>四、AI的核心技术领域</h2>
<p>AI的实现依赖于多个核心技术的协同发展，主要关键领域包括：</p>
<ol>
<li><strong>机器学习（Machine Learning, ML）</strong>：AI的核心技术，让机器通过数据自动学习规律，无需人工编程设定规则。下分监督学习、无监督学习、强化学习等主流方法，是后续各类AI技术的基础。</li>
<li><strong>深度学习（Deep Learning, DL）</strong>：机器学习的一个分支，基于多层神经网络模拟人类大脑的神经元连接方式，处理复杂的海量数据，是推动现代AI爆发式发展的核心，广泛应用于图像、语音、自然语言处理。</li>
<li><strong>自然语言处理（Natural Language Processing, NLP）</strong>：让机器理解、处理、生成人类的自然语言，实现人机语言交互，核心应用包括机器翻译、聊天机器人、文本摘要、情感分析等，大语言模型（LLM）是其现阶段的高级形态。</li>
<li><strong>计算机视觉（Computer Vision, CV）</strong>：让机器“看懂”图像和视频，实现对视觉信息的识别、检测、分割、生成，应用包括人脸识别、车牌识别、图像分类、目标检测、自动驾驶视觉感知等。</li>
<li><strong>语音识别与合成</strong>：属于NLP和CV的交叉领域，实现语音到文字的转换（识别）和文字到语音的转换（合成），应用包括语音助手、实时语音翻译、有声书生成等。</li>
<li><strong>强化学习（Reinforcement Learning, RL）</strong>：让机器通过“试错”学习，在与环境的交互中通过奖励和惩罚优化行为策略，广泛应用于智能机器人、游戏AI、自动驾驶决策等场景。</li>
<li><strong>知识图谱</strong>：以图形化结构描述事物之间的关联关系，让机器具备“知识储备”，提升推理和决策的准确性，应用于智能搜索、推荐系统、金融风控等。</li>
</ol>
<h2>五、AI的主要应用场景</h2>
<p>如今AI已渗透到社会生产和生活的各个领域，成为推动产业升级和生活便捷化的重要力量，核心应用场景包括：</p>
<h3>1. 日常生活</h3>
<p>智能语音助手、智能家电、人脸识别解锁、短视频/电商推荐算法、聊天机器人、地图导航的路径规划等。</p>
<h3>2. 工业与制造业</h3>
<p>工业机器人（焊接、装配、分拣）、智能制造的质量检测、生产流程优化、预测性维护（通过数据预判设备故障）等。</p>
<h3>3. 金融领域</h3>
<p>智能风控（识别欺诈交易）、算法交易、智能投顾、信用评级、客服机器人等。</p>
<h3>4. 医疗健康</h3>
<p>医学影像诊断（AI识别肿瘤、病灶）、辅助临床决策、药物研发（加速分子筛选）、个性化诊疗方案制定、智能养老设备等。</p>
<h3>5. 交通出行</h3>
<p>自动驾驶、智能交通调度（红绿灯优化、拥堵疏导）、网约车智能派单、物流路径优化等。</p>
<h3>6. 教育领域</h3>
<p>个性化学习（根据学生情况推送学习内容）、AI作业批改、智能答疑机器人、教育大数据分析等。</p>
<h3>7. 文创与娱乐</h3>
<p>AI绘画、AI生成文案/音乐/视频、游戏AI（智能NPC）、影视特效制作优化等。</p>
<h3>8. 公共安全与政务</h3>
<p>人脸识别安防、视频监控智能分析、疫情防控数据统计、政务智能审批、智能客服等。</p>
<h2>六、AI的发展历程</h2>
<p>AI的发展并非一帆风顺，经历了多次起伏，至今已有70余年的历史，核心阶段可概括为：</p>
<ol>
<li><strong>诞生期（1950s）</strong>：1950年，图灵发表《计算机器与智能》，提出“图灵测试”，成为AI的理论基础；1956年，达特茅斯会议召开，正式提出“人工智能”概念，AI作为一门学科诞生。</li>
<li><strong>第一次繁荣期（1956-1970s）</strong>：早期AI算法取得突破，实现了简单的定理证明、语言翻译，人们对AI充满期待，政府和企业加大投入。</li>
<li><strong>第一次寒冬（1970s-1980s）</strong>：受限于计算机算力和数据量，早期AI无法实现复杂任务，理论和技术遇到瓶颈，资金投入大幅减少。</li>
<li><strong>第二次繁荣期（1980s-1990s）</strong>：专家系统、机器学习算法发展，AI在商业领域开始应用，同时神经网络技术初步探索。</li>
<li><strong>第二次寒冬（1990s-2000s）</strong>：专家系统维护成本高、通用性差，神经网络技术发展缓慢，AI再次陷入低谷。</li>
<li><strong>现代AI爆发期（2010s至今）</strong>：随着大数据、云计算、算力的爆发式增长，深度学习算法取得重大突破，AlphaGo（2016）击败人类围棋冠军，大语言模型（ChatGPT2022）、多模态AI相继出现，AI进入工业化应用阶段，渗透到各个领域。</li>
</ol>
<h2>七、AI的争议与挑战</h2>
<p>AI在推动科技和社会发展的同时，也带来了一系列伦理、社会和技术层面的挑战，成为全球关注的焦点：</p>
<ol>
<li><strong>就业结构调整</strong>：部分重复性、标准化的工作（如流水线工人、传统客服、数据录入员）可能被AI替代，导致相关岗位人员失业，需要社会进行就业转型和技能培训。</li>
<li><strong>伦理与道德问题</strong>：AI的决策黑箱（无法解释决策原因）、算法偏见（如人脸识别对特定人群的误判）、隐私泄露（AI收集和分析海量个人数据）、深度伪造（AI生成虚假图像/视频/语音）带来的信息造假问题。</li>
<li><strong>技术安全风险</strong>：AI系统的漏洞可能被恶意利用，如自动驾驶被黑客攻击、军用AI武器的潜在风险，以及强人工智能实现后的失控风险。</li>
<li><strong>人类能力退化</strong>：过度依赖AI的辅助功能（如导航、翻译、计算），可能导致人类自身的记忆、推理、动手能力逐渐退化。</li>
<li><strong>全球发展不平衡</strong>：发达国家掌握AI核心技术和算力资源，发展中国家可能面临“数字鸿沟”，加剧全球科技和经济发展的不平衡。</li>
</ol>
<h2>八、AI的未来发展趋势</h2>
<ol>
<li><strong>多模态AI成为主流</strong>：从单一的文本/图像/语音AI，向融合文本、图像、语音、视频、触觉的多模态AI发展，实现更自然的人机交互。</li>
<li><strong>大模型向轻量化、定制化发展</strong>：通用大模型的算力成本高，未来将向轻量化的端侧AI（运行在手机、机器人等终端设备）、针对特定行业的定制化大模型发展。</li>
<li><strong>AI与实体经济深度融合</strong>：AI将不再是独立的技术工具，而是与制造业、农业、医疗、金融等实体经济深度结合，推动产业数字化、智能化升级。</li>
<li><strong>AI治理体系逐步完善</strong>：全球各国将加强AI的立法和监管，建立统一的AI伦理和安全标准，规范AI的研发和应用，防范技术风险。</li>
<li><strong>脑科学与AI的交叉融合</strong>：通过研究人类大脑的工作机制，推动类脑智能的发展，让AI更接近人类的自然智能，而非单纯的算法模拟。</li>
<li><strong>人机协同成为常态</strong>：AI并非替代人类，而是成为人类的“智能助手”，实现人类与AI的优势互补，如医生+AI影像诊断、设计师+AI创意生成。</li>
</ol>
<h2>九、总结</h2>
<p>人工智能是人类科技发展的重要里程碑，其本质是用机器模拟人类智能，解决人类难以完成的复杂任务，推动社会生产效率的提升和生活方式的变革。</p>
<p>目前的AI仍处于<strong>弱人工智能阶段</strong>，虽已实现诸多领域的应用，但远未达到具备自主意识的强人工智能。未来，AI的发展将是技术突破、产业应用和治理体系完善的协同过程，如何在利用AI推动发展的同时，规避其潜在风险，实现AI与人类社会的和谐共生，是全球需要共同面对的课题。</p>
<p>AI的核心价值并非替代人类，而是<strong>延伸人类的能力边界</strong>，让人类从重复性的工作中解放出来，专注于创意、创新、情感交流等人类独有的领域。</p>
]]></content>
  <category term="Artificial Intelligence"/>
</entry>
<entry>
  <title>Dioxus基于Rust的多平台开发框架</title>
  <link href="https://ganto.me/post/20250609"/>
  <id>https://ganto.me/post/20250609</id>
  <updated>2025-06-09T00:00:00+08:00</updated>
  <published>2025-06-09T00:00:00+08:00</published>
  <author><name>干徒</name></author>
  <summary><![CDATA[官网：https://dioxuslabs.com/ Dioxus 是用于构建全栈 Web、桌面和移动应用程序的 Rust 框架。使用实时热重载进行迭代，添加服务器函数，并在创纪录的时间内进行部署。]]></summary>
  <content type="html"><![CDATA[<p>官网：<a href="https://dioxuslabs.com/">https://dioxuslabs.com/</a></p>
<p>Dioxus 是用于构建全栈 Web、桌面和移动应用程序的 Rust 框架。使用实时热重载进行迭代，添加服务器函数，并在创纪录的时间内进行部署。</p>
]]></content>
  <category term="Rust"/>
  <category term="Dioxus"/>
</entry>
<entry>
  <title>Rust 案例 - 计算器</title>
  <link href="https://ganto.me/post/20250410"/>
  <id>https://ganto.me/post/20250410</id>
  <updated>2025-04-10T00:00:00+08:00</updated>
  <published>2025-04-10T00:00:00+08:00</published>
  <author><name>干徒</name></author>
  <summary><![CDATA[use std::io; use std::io::Write; fn main() { let mut user_typer = UserTyper::new(CommandLineComputer); user_typer.type_expr(); println!(&quot;Result: {}&quot;, user_typer.compute()); } trait Computer { fn compute(&amp;self, expr: &amp;str) -&gt; i32; } struct CommandLineComputer; impl Computer for CommandLineComputer { fn compute(&amp;self, expr: &amp;str) -&gt; i32 { let mut num1 = String::new(); let mut num2 = String::new(); let mut op: Option&lt;char&gt; = None; for c in expr.trim().chars() {]]></summary>
  <content type="html"><![CDATA[<pre><code class="language-rust">use std::io;
use std::io::Write;

fn main() {
    let mut user_typer = UserTyper::new(CommandLineComputer);
    user_typer.type_expr();
    println!(&quot;Result: {}&quot;, user_typer.compute());
}

trait Computer {
    fn compute(&amp;self, expr: &amp;str) -&gt; i32;
}

struct CommandLineComputer;

impl Computer for CommandLineComputer {
    fn compute(&amp;self, expr: &amp;str) -&gt; i32 {
        let mut num1 = String::new();
        let mut num2 = String::new();
        let mut op: Option&lt;char&gt; = None;

        for c in expr.trim().chars() {
            if c.is_digit(10) {
                if op.is_none() {
                    num1.push(c);
                } else {
                    num2.push(c);
                }
                continue;
            }
            match c {
                '+' | '-' | '*' | '/' if op.is_none() =&gt; op = Some(c),
                _ if c.is_whitespace() =&gt; continue,
                _ =&gt; panic!(&quot;Invalid character: {}&quot;, c),
            }
        }

        if num1.is_empty() || num2.is_empty() || op.is_none() {
            panic!(&quot;Invalid expression: {}&quot;, expr);
        }

        let num1 = num1.parse::&lt;i32&gt;().unwrap();
        let num2: i32 = num2.parse().unwrap();
        let op = op.unwrap();

        match op {
            '+' =&gt; num1 + num2,
            '-' =&gt; num1 - num2,
            '*' =&gt; num1 * num2,
            '/' =&gt; num1 / num2,
            _ =&gt; unreachable!(),
        }
    }
}

struct UserTyper&lt;T: Computer&gt; {
    computer: T,
    expr: String,
}

impl&lt;T: Computer&gt; UserTyper&lt;T&gt; {
    fn new(computer: T) -&gt; Self {
        Self { computer, expr: String::new() }
    }

    fn type_expr(&amp;mut self) {
        println!(&quot;Please type an expression: {}&quot;, self.expr);
        io::stdout().flush().expect(&quot;Unable to flush stdout&quot;);
        io::stdin().read_line(&amp;mut self.expr).unwrap();
    }

    fn compute(&amp;self) -&gt; i32 {
        self.computer.compute(&amp;self.expr)
    }
}

</code></pre>
]]></content>
  <category term="Rust"/>
  <category term="技术"/>
</entry>
<entry>
  <title>Rust镜像源</title>
  <link href="https://ganto.me/post/20250313"/>
  <id>https://ganto.me/post/20250313</id>
  <updated>2025-03-13T00:00:00+08:00</updated>
  <published>2025-03-13T00:00:00+08:00</published>
  <author><name>干徒</name></author>
  <summary><![CDATA[配置Rust镜像源 配置文件位置 ~/.cargo/config.toml 修改 config.toml [source.crates-io] replace-with = 'aliyun' [source.aliyun] registry = &quot;sparse+https://mirrors.aliyun.com/crates.io-index/&quot;]]></summary>
  <content type="html"><![CDATA[<h2>配置Rust镜像源</h2>
<p>配置文件位置<br />
<code>~/.cargo/config.toml</code></p>
<p>修改 config.toml</p>
<pre><code class="language-toml">[source.crates-io]
replace-with = 'aliyun'
[source.aliyun]
registry = &quot;sparse+https://mirrors.aliyun.com/crates.io-index/&quot;
</code></pre>
]]></content>
  <category term="Rust"/>
  <category term="技术"/>
</entry>
<entry>
  <title>Rust所有权</title>
  <link href="https://ganto.me/post/20250220"/>
  <id>https://ganto.me/post/20250220</id>
  <updated>2025-02-20T00:00:00+08:00</updated>
  <published>2025-02-20T00:00:00+08:00</published>
  <author><name>干徒</name></author>
  <summary><![CDATA[所有权系统是Rust中的一大特点 今日靓仔我啊，就来体验一番 我们先来看一段代码 fn main() { let s1 = String::from(&quot;hello&quot;); let s2 = s1; // s1 的所有权转移给了 s2 println!(&quot;s1: {}, s2: {}&quot;, s1, s2); // 报错，s1 已经被移动了 } 你可能不了解rust代码，那么按照你熟悉的语言去理解他，大同小异 代码中先定义了一个String字符串类型的变量 s1 然后紧接着定义了一个变量 s2，此时需要注意，s2 的值是由 s1 赋值所得（可以先简单理解为赋值） 然后打印出 s1，s2 发现报错了 问题就出现在 let s2 = s1; 这段代码，这里其实发生了所有权转移，也就是 s1 的所有权发生了向 s2 转移 那么 s1 变量在所有权发生转移后，再进行访问，那么在rust中将是不合法的访问 如果不需要所有权转移，而只是简单的拷贝，则可以使用clone函数 fn main() { let mut s1 = String::from(&quot;hel]]></summary>
  <content type="html"><![CDATA[<p>所有权系统是Rust中的一大特点<br />
今日靓仔我啊，就来体验一番</p>
<p>我们先来看一段代码</p>
<pre><code class="language-rust">fn main() {
    let s1 = String::from(&quot;hello&quot;);
    let s2 = s1; // s1 的所有权转移给了 s2
    println!(&quot;s1: {}, s2: {}&quot;, s1, s2); // 报错，s1 已经被移动了
}

</code></pre>
<p><em><strong>你可能不了解rust代码，那么按照你熟悉的语言去理解他，大同小异</strong></em></p>
<p>代码中先定义了一个String字符串类型的变量 <code>s1</code></p>
<p>然后紧接着定义了一个变量 <code>s2</code>，此时需要注意，<code>s2</code> 的值是由 <code>s1</code> 赋值所得（可以先简单理解为赋值）<br />
然后打印出 <code>s1</code>，<code>s2</code> 发现报错了</p>
<p>问题就出现在 <code>let s2 = s1;</code> 这段代码，这里其实发生了所有权转移，也就是 <code>s1</code> 的所有权发生了向 <code>s2</code> 转移</p>
<p>那么 <code>s1</code> 变量在所有权发生转移后，再进行访问，那么在rust中将是不合法的访问</p>
<p>如果不需要所有权转移，而只是简单的拷贝，则可以使用clone函数</p>
<pre><code class="language-rust">fn main() {
    let mut s1 = String::from(&quot;hello&quot;);
    let s2 = s1.clone(); // 深拷贝
    println!(&quot;s1: {}, s2: {}&quot;, s1, s2);
    s1.push_str(&quot; world&quot;); // 修改 s1
    println!(&quot;s1: {}, s2: {}&quot;, s1, s2); // s2 的值没有改变，说明是深拷贝
}

</code></pre>
<p>以上代码，通过对 <code>s1</code> 进行修改，会发现 <code>s2</code> 没有被一同修改，说明 <code>clone()</code> 函数是深拷贝</p>
<p>体验了rust中的所有权，很奇妙，像进了米奇妙妙屋...</p>
]]></content>
  <category term="Rust"/>
  <category term="后端"/>
  <category term="技术"/>
</entry>
<entry>
  <title>JavaScript 高阶函数之 reduce</title>
  <link href="https://ganto.me/post/20250220-2"/>
  <id>https://ganto.me/post/20250220-2</id>
  <updated>2025-02-20T00:00:00+08:00</updated>
  <published>2025-02-20T00:00:00+08:00</published>
  <author><name>干徒</name></author>
  <summary><![CDATA[MDN：https://developer.mozilla.org/zh-CN/docs/Web/JavaScript/Reference/Global_Objects/Array/reduce 关于reduce函数，我们再熟悉不过了，我们通常用他对数据进行求和，也被称为累加器 reduce常见用例如下： let goods = [ { name: &quot;T恤&quot;, price: 99, count: 2 }, { name: &quot;polo衫&quot;, price: 120, count: 1 }, { name: &quot;牛仔裤&quot;, price: 197, count: 11 } ] const goodsSum = goods.reduce((sum, item) =&gt; { return sum + item.price * item.count; }, initSum = 0) console.log(goodsSum) // 2485 以上代码，我相信对于你那真是信手捏来... 但是还是需要解释一下，reduce就是对goods数组]]></summary>
  <content type="html"><![CDATA[<blockquote>
<p>MDN：<a href="https://developer.mozilla.org/zh-CN/docs/Web/JavaScript/Reference/Global_Objects/Array/reduce">https://developer.mozilla.org/zh-CN/docs/Web/JavaScript/Reference/Global_Objects/Array/reduce</a></p>
</blockquote>
<p>关于reduce函数，我们再熟悉不过了，我们通常用他对数据进行求和，也被称为<strong>累加器</strong></p>
<p>reduce常见用例如下：</p>
<pre><code class="language-js">let goods = [
  { name: &quot;T恤&quot;, price: 99, count: 2 },
  { name: &quot;polo衫&quot;, price: 120, count: 1 },
  { name: &quot;牛仔裤&quot;, price: 197, count: 11 }
]

const goodsSum = goods.reduce((sum, item) =&gt; {
  return sum + item.price * item.count;
}, initSum = 0)

console.log(goodsSum) // 2485

</code></pre>
<p>以上代码，我相信对于你那真是信手捏来...</p>
<blockquote>
<p>但是还是需要解释一下，reduce就是对goods数组中的每项的价格进行相加<br />
reduce传递两个参数，第一个参数是一个回调函数，第二个参数是一个用于统计累加结果的初始值<br />
reduce函数的第一个回调函数又有两个参数，第一个参数<code>sum</code>的初始状态等于reduce第二个参数<code>initSum</code>，在reduce执行完一次，第一个参数<code>sum</code>会变成reduce执行完返回的内容<br />
reduce函数的第一个回调函数的第二个参数也就是goods数组中的每项<br />
reduce执行次数与数组的长度有关</p>
</blockquote>
<p>在阅读vue官方文档的时候，发现了一段有趣的代码</p>
<pre><code class="language-js">// plugins/i18n.js
export default {
  install: (app, options) =&gt; {
    // 注入一个全局可用的 $translate() 方法
    app.config.globalProperties.$translate = (key) =&gt; {
      // 获取 `options` 对象的深层属性
      // 使用 `key` 作为索引
      return key.split('.').reduce((o, i) =&gt; {
        if (o) return o[i]
      }, options)
    }
  }
}

</code></pre>
<p>以上代码是vue中定义一个插件的代码，有趣的是其中的reduce函数</p>
<p>我们将代码进行精简</p>
<pre><code class="language-js">let obj = {
  greetings: {
    hello: &quot;你好&quot;
  }
}

const ret = &quot;greetings.hello&quot;.split('.').reduce((o, i) =&gt; {
  if (o) {
    return o[i]
  }
}, obj)

console.log(ret)

</code></pre>
<p>以上代码是通过&quot;greetings.hello&quot;这段字符串，进而获取obj对象中的值</p>
<p>以上代码<code>&quot;greetings.hello&quot;.split('.')</code> 就是数组 <code>[&quot;greetings&quot;, &quot;hello&quot;]</code></p>
<p>reduce函数中的第一个回调函数中的第一个参数也就是<code>o</code>等于<code>obj</code>对象，第二个参数<code>i</code>变成了 <code>[&quot;greetings&quot;, &quot;hello&quot;]</code> 数组中的每项</p>
<p>第一次执行 <code>o 是 {greetings: {hello: &quot;你好&quot;}}</code> <code>i 是 &quot;greetings&quot;</code> ，返回 <code>o[i] 也就是 {hello: &quot;你好&quot;}</code> 此时 <code>o 变成 {hello: &quot;你好&quot;}</code></p>
<p>进入下一次reduce回调</p>
<p>第二次执行 <code>o 是 {hello: &quot;你好&quot;}</code> <code>i 是 &quot;hello&quot;</code> ，返回 <code>o[i] 也就是 &quot;你好&quot;</code></p>
<p>结束reduce</p>
<p>返回 <code>&quot;你好&quot;</code></p>
<p>啊？reduce函数还能这么用！</p>
]]></content>
  <category term="JavaScript"/>
  <category term="Vue"/>
  <category term="前端"/>
  <category term="技术"/>
</entry>
<entry>
  <title>JavaScript中的&quot;事件冒泡&quot;与&quot;事件捕获&quot;</title>
  <link href="https://ganto.me/post/20241220"/>
  <id>https://ganto.me/post/20241220</id>
  <updated>2024-12-20T00:00:00+08:00</updated>
  <published>2024-12-20T00:00:00+08:00</published>
  <author><name>干徒</name></author>
  <summary><![CDATA[前言 Capture：事件捕获 Bubble：事件冒泡 如图所示，大致展示了事件冒泡和事件捕获的流程 可能还有点迷惑，无妨，继续往下看 事件冒泡展示 我们先创建一个嵌套的HTML结构 &lt;div class=&quot;div1&quot;&gt; &lt;p&gt;div1&lt;/p&gt; &lt;div class=&quot;div2&quot;&gt; &lt;p&gt;div2&lt;/p&gt; &lt;button&gt;CLICK ME!&lt;/button&gt; &lt;/div&gt; &lt;/div&gt; 并且为他们各自添加点击事件，并给window和document也添加上点击事件 window.addEventListener(&quot;click&quot;, () =&gt; { console.log('Window'); }); document.addEventListener(&quot;click&quot;, () =&gt; { console.log('Document'); }); document.querySelec]]></summary>
  <content type="html"><![CDATA[<h2>前言</h2>
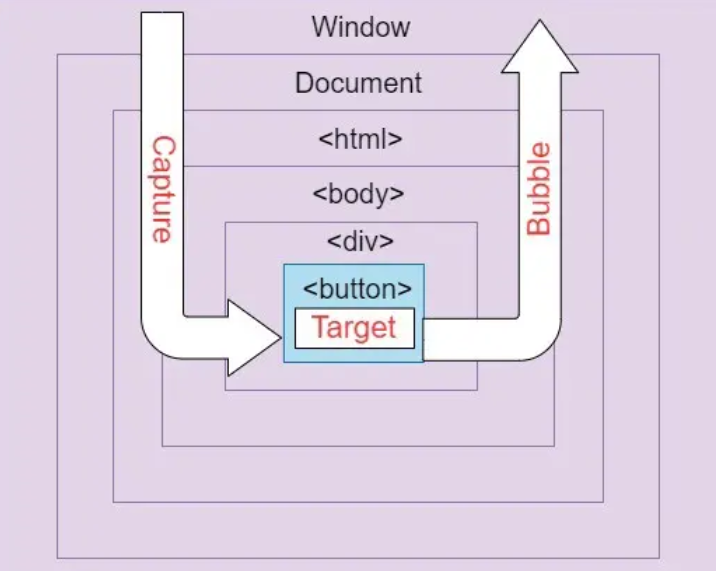
<p>Capture：事件捕获<br />
Bubble：事件冒泡</p>
<p><img src="https://img2024.cnblogs.com/blog/2229842/202412/2229842-20241220165118171-411205481.png" alt="" /><br />
如图所示，大致展示了事件冒泡和事件捕获的流程</p>
<p>可能还有点迷惑，无妨，继续往下看</p>
<h2>事件冒泡展示</h2>
<p>我们先创建一个嵌套的HTML结构</p>
<pre><code class="language-html">&lt;div class=&quot;div1&quot;&gt;
    &lt;p&gt;div1&lt;/p&gt;
    &lt;div class=&quot;div2&quot;&gt;
        &lt;p&gt;div2&lt;/p&gt;
        &lt;button&gt;CLICK ME!&lt;/button&gt;
    &lt;/div&gt;
&lt;/div&gt;

</code></pre>
<p>并且为他们各自添加点击事件，并给window和document也添加上点击事件</p>
<pre><code class="language-js">window.addEventListener(&quot;click&quot;, () =&gt; {
  console.log('Window');
});
document.addEventListener(&quot;click&quot;, () =&gt; {
  console.log('Document');
});
document.querySelector(&quot;.div1&quot;).addEventListener(&quot;click&quot;, () =&gt; {
  console.log('DIV 1');
});
document.querySelector(&quot;.div2&quot;).addEventListener(&quot;click&quot;, () =&gt; { 
  console.log('DIV 2');
});
document.querySelector(&quot;button&quot;).addEventListener(&quot;click&quot;, () =&gt; {
  console.log('CLICK ME!');
});

</code></pre>
<p>完整代码</p>
<pre><code class="language-html">&lt;!DOCTYPE html&gt;
&lt;html lang=&quot;en&quot;&gt;
&lt;head&gt;
  &lt;meta charset=&quot;UTF-8&quot;&gt;
  &lt;meta name=&quot;viewport&quot; content=&quot;width=device-width, initial-scale=1.0&quot;&gt;
  &lt;title&gt;Document&lt;/title&gt;
&lt;/head&gt;
&lt;body&gt;
  &lt;div class=&quot;div1&quot;&gt;
    &lt;p&gt;div1&lt;/p&gt;
    &lt;div class=&quot;div2&quot;&gt;
        &lt;p&gt;div2&lt;/p&gt;
        &lt;button&gt;CLICK ME!&lt;/button&gt;
    &lt;/div&gt;
  &lt;/div&gt;
  &lt;script&gt;
    window.addEventListener(&quot;click&quot;, () =&gt; {
      console.log('Window');
    });
    document.addEventListener(&quot;click&quot;, () =&gt; {
      console.log('Document');
    });
    document.querySelector(&quot;.div1&quot;).addEventListener(&quot;click&quot;, () =&gt; {
      console.log('DIV 1');
    });
    document.querySelector(&quot;.div2&quot;).addEventListener(&quot;click&quot;, () =&gt; { 
      console.log('DIV 2');
    });
    document.querySelector(&quot;button&quot;).addEventListener(&quot;click&quot;, () =&gt; {
      console.log('CLICK ME!');
    });
  &lt;/script&gt;
&lt;/body&gt;
&lt;/html&gt;

</code></pre>
<p>在点击<code>CLICK ME!</code>按钮的时候，可以在控制台看到打印结果</p>
<pre><code class="language-css">CLICK ME!
DIV 2
DIV 1
Document
Window

</code></pre>
<p>以上代码所绑定的所有点击事件，默认都是事件冒泡，所以事件触发会由内往外扩展</p>
<h2>事件捕获展示</h2>
<p>如上代码可知，默认绑定的事件会默认开始事件冒泡，如果想要开始事件捕获，可以通过事件绑定的第三个参数进行设置</p>
<pre><code class="language-js">document.querySelector(&quot;button&quot;).addEventListener(&quot;click&quot;, () =&gt; {
  console.log('CLICK ME!');
}, true);

</code></pre>
<p>因为第三个参数如果不进行传入，则默认为false，也就是事件冒泡模式</p>
<p>现在我们重新修改代码</p>
<pre><code class="language-js">window.addEventListener(&quot;click&quot;, () =&gt; {
  console.log('Window');
}, true);
document.addEventListener(&quot;click&quot;, () =&gt; {
  console.log('Document');
}, true);
document.querySelector(&quot;.div1&quot;).addEventListener(&quot;click&quot;, () =&gt; {
  console.log('DIV 1');
}, true);
document.querySelector(&quot;.div2&quot;).addEventListener(&quot;click&quot;, () =&gt; { 
  console.log('DIV 2');
}, true);
document.querySelector(&quot;button&quot;).addEventListener(&quot;click&quot;, () =&gt; {
  console.log('CLICK ME!');
}, true);

</code></pre>
<p>完整代码</p>
<pre><code class="language-html">&lt;!DOCTYPE html&gt;
&lt;html lang=&quot;en&quot;&gt;
&lt;head&gt;
  &lt;meta charset=&quot;UTF-8&quot;&gt;
  &lt;meta name=&quot;viewport&quot; content=&quot;width=device-width, initial-scale=1.0&quot;&gt;
  &lt;title&gt;Document&lt;/title&gt;
&lt;/head&gt;
&lt;body&gt;
  &lt;div class=&quot;div1&quot;&gt;
    &lt;p&gt;div1&lt;/p&gt;
    &lt;div class=&quot;div2&quot;&gt;
        &lt;p&gt;div2&lt;/p&gt;
        &lt;button&gt;CLICK ME!&lt;/button&gt;
    &lt;/div&gt;
  &lt;/div&gt;
  &lt;script&gt;
    window.addEventListener(&quot;click&quot;, () =&gt; {
      console.log('Window');
    }, true);
    document.addEventListener(&quot;click&quot;, () =&gt; {
      console.log('Document');
    }, true);
    document.querySelector(&quot;.div1&quot;).addEventListener(&quot;click&quot;, () =&gt; {
      console.log('DIV 1');
    }, true);
    document.querySelector(&quot;.div2&quot;).addEventListener(&quot;click&quot;, () =&gt; { 
      console.log('DIV 2');
    }, true);
    document.querySelector(&quot;button&quot;).addEventListener(&quot;click&quot;, () =&gt; {
      console.log('CLICK ME!');
    }, true);
  &lt;/script&gt;
&lt;/body&gt;
&lt;/html&gt;

</code></pre>
<p>打印结果</p>
<pre><code class="language-css">Window
Document
DIV 1
DIV 2
CLICK ME!

</code></pre>
<p>这时再次触发<code>CLICK ME!</code>按钮的点击事件，发现打印结果反过来了</p>
<p>因为这时已经是通过事件捕获进行了依次触发</p>
<h2>事件冒泡和事件捕获混用</h2>
<p>如果将两者混用会发生什么？<br />
依然会遵循两者的执行顺序</p>
<pre><code class="language-js">window.addEventListener(&quot;click&quot;, () =&gt; {
  console.log('Window');
}, true);
document.addEventListener(&quot;click&quot;, () =&gt; {
  console.log('Document');
}, true);
document.querySelector(&quot;.div1&quot;).addEventListener(&quot;click&quot;, () =&gt; {
  console.log('DIV 1');
}, false);
document.querySelector(&quot;.div2&quot;).addEventListener(&quot;click&quot;, () =&gt; { 
  console.log('DIV 2');
}, false);
document.querySelector(&quot;button&quot;).addEventListener(&quot;click&quot;, () =&gt; {
  console.log('CLICK ME!');
}, true);

</code></pre>
<p>完整代码</p>
<pre><code class="language-html">&lt;!DOCTYPE html&gt;
&lt;html lang=&quot;en&quot;&gt;
&lt;head&gt;
  &lt;meta charset=&quot;UTF-8&quot;&gt;
  &lt;meta name=&quot;viewport&quot; content=&quot;width=device-width, initial-scale=1.0&quot;&gt;
  &lt;title&gt;Document&lt;/title&gt;
&lt;/head&gt;
&lt;body&gt;
  &lt;div class=&quot;div1&quot;&gt;
    &lt;p&gt;div1&lt;/p&gt;
    &lt;div class=&quot;div2&quot;&gt;
        &lt;p&gt;div2&lt;/p&gt;
        &lt;button&gt;CLICK ME!&lt;/button&gt;
    &lt;/div&gt;
  &lt;/div&gt;
  &lt;script&gt;
    window.addEventListener(&quot;click&quot;, () =&gt; {
      console.log('Window');
    }, true);
    document.addEventListener(&quot;click&quot;, () =&gt; {
      console.log('Document');
    }, true);
    document.querySelector(&quot;.div1&quot;).addEventListener(&quot;click&quot;, () =&gt; {
      console.log('DIV 1');
    }, false);
    document.querySelector(&quot;.div2&quot;).addEventListener(&quot;click&quot;, () =&gt; { 
      console.log('DIV 2');
    }, false);
    document.querySelector(&quot;button&quot;).addEventListener(&quot;click&quot;, () =&gt; {
      console.log('CLICK ME!');
    }, true);
  &lt;/script&gt;
&lt;/body&gt;
&lt;/html&gt;

</code></pre>
<p>打印结果</p>
<pre><code class="language-css">Window
Document
CLICK ME!
DIV 2
DIV 1

</code></pre>
<p>优先依次执行事件捕获，再从最内部开始依次事件冒泡</p>
]]></content>
  <category term="JavaScript"/>
  <category term="技术"/>
</entry>
<entry>
  <title>今天，学习Web Component</title>
  <link href="https://ganto.me/post/20240511"/>
  <id>https://ganto.me/post/20240511</id>
  <updated>2024-05-11T00:00:00+08:00</updated>
  <published>2024-05-11T00:00:00+08:00</published>
  <author><name>干徒</name></author>
  <summary><![CDATA[Web Component MDN 阮一峰 web components 例子1： &lt;!DOCTYPE html&gt; &lt;html lang=&quot;en&quot;&gt; &lt;head&gt; &lt;meta charset=&quot;UTF-8&quot;&gt; &lt;meta name=&quot;viewport&quot; content=&quot;width=device-width, initial-scale=1.0&quot;&gt; &lt;title&gt;Document&lt;/title&gt; &lt;/head&gt; &lt;body&gt; &lt;popup-info text=&quot;web components&quot; style=&quot;background-color: 50px;&quot;/&gt; &lt;script&gt; // Create a class for the element class PopUpInfo extends HTMLElement { constructo]]></summary>
  <content type="html"><![CDATA[<p><a href="https://developer.mozilla.org/zh-CN/docs/Web/API/Web_components">Web Component MDN</a><br />
<a href="https://www.ruanyifeng.com/blog/2019/08/web_components.html">阮一峰 web components</a></p>
<h2>例子1：</h2>
<pre><code class="language-html">&lt;!DOCTYPE html&gt;
&lt;html lang=&quot;en&quot;&gt;
&lt;head&gt;
  &lt;meta charset=&quot;UTF-8&quot;&gt;
  &lt;meta name=&quot;viewport&quot; content=&quot;width=device-width, initial-scale=1.0&quot;&gt;
  &lt;title&gt;Document&lt;/title&gt;
&lt;/head&gt;
&lt;body&gt;
  &lt;popup-info text=&quot;web components&quot; style=&quot;background-color: 50px;&quot;/&gt;

  &lt;script&gt;
    // Create a class for the element
    class PopUpInfo extends HTMLElement {
      constructor() {
        // Always call super first in constructor
        super();

        // Create a shadow root
        var shadow = this.attachShadow({ mode: &quot;open&quot; });

        // Create spans
        var wrapper = document.createElement(&quot;span&quot;);
        wrapper.setAttribute(&quot;class&quot;, &quot;wrapper&quot;);
        var icon = document.createElement(&quot;span&quot;);
        icon.setAttribute(&quot;class&quot;, &quot;icon&quot;);
        icon.setAttribute(&quot;tabindex&quot;, &quot;0&quot;);
        var info = document.createElement(&quot;span&quot;);
        info.setAttribute(&quot;class&quot;, &quot;info&quot;);

        // Take attribute content and put it inside the info span
        var text = this.getAttribute(&quot;text&quot;);
        info.textContent = text;

        // Insert icon
        var imgUrl;
        if (this.hasAttribute(&quot;img&quot;)) {
          imgUrl = this.getAttribute(&quot;img&quot;);
        } else {
          imgUrl = &quot;https://baidu.com/favicon.ico&quot;;
        }
        var img = document.createElement(&quot;img&quot;);
        img.style = `
          width: 50px;
          height: 50px;
          border: 2px solid #f0f;
          border-radius: 10px;
        `
        img.src = imgUrl;
        icon.appendChild(img);

        // Create some CSS to apply to the shadow dom
        var style = document.createElement(&quot;style&quot;);

        style.textContent = `
          .wrapper {
            position: relative;
          }
          
          .info {
            font-size: 0.8rem;
            width: 200px;
            display: inline-block;
            border: 1px solid black;
            padding: 10px;
            background: white;
            border-radius: 10px;
            opacity: 0;
            transition: 0.6s all;
            position: absolute;
            top: 20px;
            left: 10px;
            z-index: 3;
          }
          
          img {
            width: 20.2rem;
          }
          
          .icon:hover + .info, .icon:focus + .info {
            opacity: 1;
          }
        `;

        // attach the created elements to the shadow dom

        shadow.appendChild(style);
        shadow.appendChild(wrapper);
        wrapper.appendChild(icon);
        wrapper.appendChild(info);
      }
    }

    customElements.define(&quot;popup-info&quot;, PopUpInfo);
  &lt;/script&gt;
&lt;/body&gt;
&lt;/html&gt;

</code></pre>
<h2>例子2：</h2>
<p>这个例子使用了template标签的形式描述html结构，而不是如例子1那样，用纯js来描述html结构<br />
index.html</p>
<pre><code class="language-html">&lt;!DOCTYPE html&gt;
&lt;html&gt;

&lt;head&gt;
  &lt;meta charset=&quot;utf-8&quot;&gt;
  &lt;meta name=&quot;viewport&quot; content=&quot;width=device-width&quot;&gt;
  &lt;title&gt;JS Bin&lt;/title&gt;
&lt;/head&gt;

&lt;body&gt;
  &lt;user-card image=&quot;https://semantic-ui.com/images/avatar2/large/kristy.png&quot; name=&quot;User Name&quot;
    email=&quot;yourmail@some-email.com&quot;&gt;&lt;/user-card&gt;

  &lt;template id=&quot;userCardTemplate&quot;&gt;
    &lt;style&gt;
      :host {
        display: flex;
        align-items: center;
        width: 450px;
        height: 180px;
        background-color: #d4d4d4;
        border: 1px solid #d5d5d5;
        box-shadow: 1px 1px 5px rgba(0, 0, 0, 0.1);
        border-radius: 3px;
        overflow: hidden;
        padding: 10px;
        box-sizing: border-box;
        font-family: 'Poppins', sans-serif;
      }

      .image {
        flex: 0 0 auto;
        width: 160px;
        height: 160px;
        vertical-align: middle;
        border-radius: 5px;
      }

      .container {
        box-sizing: border-box;
        padding: 20px;
        height: 160px;
      }

      .container&gt;.name {
        font-size: 20px;
        font-weight: 600;
        line-height: 1;
        margin: 0;
        margin-bottom: 5px;
      }

      .container&gt;.email {
        font-size: 12px;
        opacity: 0.75;
        line-height: 1;
        margin: 0;
        margin-bottom: 15px;
      }

      .container&gt;.button {
        padding: 10px 25px;
        font-size: 12px;
        border-radius: 5px;
        text-transform: uppercase;
      }
    &lt;/style&gt;

    &lt;img class=&quot;image&quot;&gt;
    &lt;div class=&quot;container&quot;&gt;
      &lt;p class=&quot;name&quot;&gt;&lt;/p&gt;
      &lt;p class=&quot;email&quot;&gt;&lt;/p&gt;
      &lt;button class=&quot;button&quot;&gt;Follow John&lt;/button&gt;
    &lt;/div&gt;
  &lt;/template&gt;

  &lt;script src=&quot;./index.js&quot;&gt;&lt;/script&gt;
&lt;/body&gt;

&lt;/html&gt;

</code></pre>
<p>index.js</p>
<pre><code class="language-js">class UserCard extends HTMLElement {
  constructor() {
    super();
    var shadow = this.attachShadow( { mode: 'closed' } );
    
    var templateElem = document.getElementById('userCardTemplate');
    var content = templateElem.content.cloneNode(true); // 这里克隆一个新的结构，而不是在原template节点上操作，因为确保原template不会变化，从而可以复用
    content.querySelector('img').setAttribute('src', this.getAttribute('image'));
    content.querySelector('.container&gt;.name').innerText = this.getAttribute('name');
    content.querySelector('.container&gt;.email').innerText = this.getAttribute('email');

    shadow.appendChild(content);
  }
}
window.customElements.define('user-card', UserCard);

</code></pre>
<h2>说明</h2>
<p><code>this.attachShadow( { mode: 'closed' } );</code> 这段代码是创建一个自定义元素<br />
<code>mode: 'closed'</code>表示自定义组件对外部不可见，即不能通过JavaScript访问，也不能通过外部CSS样式表来直接修改其内部元素的样式<br />
可选项为 <code>open</code>、<code>closed</code>，mode属性必须写</p>
<h2>生命周期</h2>
<table>
<thead>
<tr>
<th>函数</th>
<th>说明</th>
</tr>
</thead>
<tbody>
<tr>
<td>connectedCallback</td>
<td>自定义元素添加至页面。</td>
</tr>
<tr>
<td>disconnectedCallback</td>
<td>自定义元素从页面中移除。</td>
</tr>
<tr>
<td>adoptedCallback</td>
<td>自定义元素移动至新页面。</td>
</tr>
<tr>
<td>attributeChangedCallback</td>
<td>属性改变</td>
</tr>
</tbody>
</table>
<pre><code class="language-html">&lt;!DOCTYPE html&gt;
&lt;html&gt;

&lt;head&gt;
  &lt;meta charset=&quot;utf-8&quot;&gt;
  &lt;meta name=&quot;viewport&quot; content=&quot;width=device-width&quot;&gt;
  &lt;title&gt;Web Component&lt;/title&gt;
&lt;/head&gt;

&lt;body&gt;
  &lt;iframe id=&quot;iframe&quot; style=&quot;display: none;&quot; frameborder=&quot;0&quot;&gt;&lt;/iframe&gt;

  &lt;my-com class=&quot;my-com&quot; data=&quot;123&quot;&gt;&lt;/my-com&gt;
  &lt;button onclick=&quot;document.querySelector('.my-com').remove()&quot;&amp;gt;移除组件&lt;/button&gt;
  &lt;button onclick=&quot;move()&quot;&amp;gt;移动到新页面&lt;/button&gt;
  &lt;button onclick=&quot;document.querySelector('.my-com').setAttribute('data', '456')&quot;&amp;gt;变更属性&lt;/button&gt;

  &lt;script&gt;
    function move() {
      const iframeNode = document.querySelector('#iframe').contentDocument
      console.dir(iframeNode, '===');
      const myComNode = document.querySelector('.my-com')
      iframeNode.body.appendChild(myComNode.cloneNode(true))

      // document.querySelector('.my-com').remove()
    }
  &lt;/script&gt;
  &lt;script src=&quot;./MyCom.js&quot;&gt;&lt;/script&gt;
&lt;/body&gt;

&lt;/html&gt;

</code></pre>
<pre><code class="language-js">class MyCom extends HTMLElement {
  constructor() {
    super();
    var shadow = this.attachShadow({ mode: &quot;open&quot; });

    const div = document.createElement(&quot;div&quot;)
    div.innerHTML = &quot;123&quot;

    shadow.appendChild(div)
  }

  static get observedAttributes() {
    return ['data'];
  }

  connectedCallback() {
    console.log(&quot;自定义元素添加至页面。&quot;);
  }

  disconnectedCallback() {
    console.log(&quot;自定义元素从页面中移除。&quot;);
  }

  adoptedCallback() {
    console.log(&quot;自定义元素移动至新页面。&quot;);
  }

  attributeChangedCallback(name, oldValue, newValue) {
    console.log(`属性 ${name} 已变更。 变更前 ${oldValue}, 变更后 ${newValue} 。`);
  }
}

customElements.define(&quot;my-com&quot;, MyCom);

</code></pre>
]]></content>
  <category term="JavaScript"/>
  <category term="技术"/>
</entry>
<entry>
  <title>Gin中间件上下文中的Set、Get函数的用法</title>
  <link href="https://ganto.me/post/20240415"/>
  <id>https://ganto.me/post/20240415</id>
  <updated>2024-04-15T00:00:00+08:00</updated>
  <published>2024-04-15T00:00:00+08:00</published>
  <author><name>干徒</name></author>
  <summary><![CDATA[Code 如下代码所示，中间件middlewareA内部通过c.Set(&quot;middlewareA_key&quot;, str)将参数设置到上下文中 所以中间件middlewareB可以通过c.Get(&quot;middlewareA_key&quot;)获取到上下文中传递的值，并将值进行了修改，然后继续通过上下文进行了传递 然后在控制器函数中可以通过上下文c.Keys[&quot;middlewareB_key&quot;]的方式获取 package main import ( &quot;fmt&quot; &quot;github.com/gin-gonic/gin&quot; ) func main() { router := gin.Default() router.Use(middlewareA(&quot;中间件A传递的值&quot;), middlewareB()) router.GET(&quot;/&quot;, func(c *gin.Context) { valueA := c.Keys[&quot;middlewareA_key&quot;] va]]></summary>
  <content type="html"><![CDATA[<h2>Code</h2>
<p>如下代码所示，中间件<code>middlewareA</code>内部通过<code>c.Set(&quot;middlewareA_key&quot;, str)</code>将参数设置到上下文中<br />
所以中间件<code>middlewareB</code>可以通过<code>c.Get(&quot;middlewareA_key&quot;)</code>获取到上下文中传递的值，并将值进行了修改，然后继续通过上下文进行了传递<br />
然后在控制器函数中可以通过上下文<code>c.Keys[&quot;middlewareB_key&quot;]</code>的方式获取</p>
<pre><code class="language-go">package main

import (
	&quot;fmt&quot;
	&quot;github.com/gin-gonic/gin&quot;
)

func main() {
	router := gin.Default()

	router.Use(middlewareA(&quot;中间件A传递的值&quot;), middlewareB())
	router.GET(&quot;/&quot;, func(c *gin.Context) {
		valueA := c.Keys[&quot;middlewareA_key&quot;]
		valueB := c.Keys[&quot;middlewareB_key&quot;]
		c.JSON(200, gin.H{
			&quot;data&quot;: map[string]any{
				&quot;middlewareA&quot;: valueA,
				&quot;middlewareB&quot;: valueB,
			},
		})
	})

	if err := router.Run(&quot;:8090&quot;); err != nil {
		fmt.Printf(&quot;run server error: %v&quot;, err)
		panic(err)
	}
}

func middlewareA(str string) gin.HandlerFunc {
	return func(c *gin.Context) {
		c.Set(&quot;middlewareA_key&quot;, str)
		c.Next()
	}
}

func middlewareB() gin.HandlerFunc {
	return func(c *gin.Context) {
		middlewareAKey, _ := c.Get(&quot;middlewareA_key&quot;)
		c.Set(&quot;middlewareB_key&quot;, middlewareAKey.(string)+&quot; *** 我是中间件B&quot;)
		c.Next()
	}
}

</code></pre>
<p>需要注意的是，中间件设置的数据，会同时存在在控制器函数的上下文中，均可以获取</p>
<h2>Return</h2>
<p>请求：<a href="http://localhost:8090">http://localhost:8090</a></p>
<pre><code class="language-json">{
    &quot;data&quot;: {
        &quot;middlewareA&quot;: &quot;中间件A传递的值&quot;,
        &quot;middlewareB&quot;: &quot;中间件A传递的值 *** 我是中间件B&quot;
    }
}

</code></pre>
]]></content>
  <category term="Golang"/>
  <category term="后端"/>
  <category term="技术"/>
</entry>
<entry>
  <title>React中forwardRef的用法</title>
  <link href="https://ganto.me/post/20240412"/>
  <id>https://ganto.me/post/20240412</id>
  <updated>2024-04-12T00:00:00+08:00</updated>
  <published>2024-04-12T00:00:00+08:00</published>
  <author><name>干徒</name></author>
  <summary><![CDATA[官网文档：https://zh-hans.react.dev/reference/react/forwardRef 今天我们就一起学习一下React中的ref怎么获取组件实例，只讨论函数式组件中的ref 如下代码，我们直接在App根组件中，意图只使用ref就获取Footer组件实例 细心的同学可能已经发现控制台报错了，提示我们应该使用forwardRef，并且编辑器也提示ref={footRef}类型不对 这是因为React不会默认暴露组件中的东西，如果开发者想要从组件中暴露出来东西，需要手动挡进行操作，这也是为了组件数据安全的考量 App.tsx import { useRef } from 'react' import { Footer } from '@/components/footer' const App = () =&gt; { const footRef = useRef(null) const getFootRef = () =&gt; { console.log(footRef.current) } return ( &lt;div className='app'&]]></summary>
  <content type="html"><![CDATA[<blockquote>
<p>官网文档：<a href="https://zh-hans.react.dev/reference/react/forwardRef">https://zh-hans.react.dev/reference/react/forwardRef</a></p>
</blockquote>
<p>今天我们就一起学习一下React中的ref怎么获取组件实例，只讨论函数式组件中的ref</p>
<p>如下代码，我们直接在App根组件中，意图只使用ref就获取Footer组件实例</p>
<p>细心的同学可能已经发现控制台报错了，提示我们应该使用forwardRef，并且编辑器也提示<code>ref={footRef}</code>类型不对</p>
<p>这是因为React不会默认暴露组件中的东西，如果开发者想要从组件中暴露出来东西，需要手动挡进行操作，这也是为了组件数据安全的考量</p>
<p>App.tsx</p>
<pre><code class="language-tsx">import { useRef } from 'react'
import { Footer } from '@/components/footer'

const App = () =&gt; {
  const footRef = useRef(null)
  const getFootRef = () =&gt; {
    console.log(footRef.current)
  }
  return (
    &lt;div className='app'&gt;
      &lt;h1&gt;App&lt;/h1&gt;
      &lt;button onClick={getFootRef}&gt;Show footRef&lt;/button&gt;
      &lt;Footer ref={footRef}&gt;&lt;/Footer&gt;
    &lt;/div&gt;
  )
}

export default App

</code></pre>
<p>components/Footer/index.tsx</p>
<pre><code class="language-tsx">import { useState } from 'react'

export const Footer = () =&gt; {
  const [count, setCount] = useState(0)
  return (
    &lt;div className=&quot;footer&quot;&gt;
      &lt;h1&gt;Footer&lt;/h1&gt;
      &lt;p&gt;{ count }&lt;/p&gt;
      &lt;button onClick={() =&gt; setCount(count + 1)}&gt;Click Me&lt;/button&gt;
    &lt;/div&gt;
  )
}

</code></pre>
<p>那么我们如何获取组件实例呢</p>
<p>直接请出forwardRef来对Footer组件进行改造</p>
<p>App.tsx 不变</p>
<p>Footer组件改造如下</p>
<p>components/Footer/index.tsx</p>
<pre><code class="language-tsx">import { useState, forwardRef } from 'react'

export const Footer = forwardRef&lt;HTMLDivElement&gt;((props, ref) =&gt; {
  console.log(props)
  const [count, setCount] = useState(0)
  return (
    &lt;div className=&quot;footer&quot;&gt;
      &lt;h1&gt;Footer&lt;/h1&gt;
      &lt;p ref={ref}&gt;{ count }&lt;/p&gt;
      &lt;button onClick={() =&gt; setCount(count + 1)}&gt;Click Me&lt;/button&gt;
    &lt;/div&gt;
  )
})

</code></pre>
<p>可以看出已经能打印出来p标签了，等等...为什么ref绑定在了p标签上，是的没错，想将哪个标签暴露给父组件，就绑定给谁身上</p>
<p>forwardRef的用法就是直接套在组件函数外部，此时组件函数入参的第一个参数依然是props，第二个参数就是ref</p>
<p>此时更应该注意的是，forwardRef需要编写泛型，该泛型就是需要暴露出去的东东的类型，如上代码，我们将p标签暴露出去了</p>
<p>如想将组件状态数据暴露出去，需要使用一个Hook，那就是<code>useImperativeHandle</code></p>
<p>使用方法见以下代码</p>
<p>App.tsx不变</p>
<p>Footer组件改造为以下</p>
<p>components/Footer/index.tsx</p>
<pre><code class="language-tsx">import { useState, useRef, forwardRef, useImperativeHandle } from 'react'

export const Footer = forwardRef&lt;object&gt;((props, ref) =&gt; {
  console.log(props)
  const [count, setCount] = useState(0)
  const pRef = useRef&lt;HTMLParagraphElement&gt;(null)

  useImperativeHandle(ref, () =&gt; {
    return {
      count,
      pRef
    }
  })

  return (
    &lt;div className=&quot;footer&quot;&gt;
      &lt;h1&gt;Footer&lt;/h1&gt;
      &lt;p ref={pRef}&gt;{ count }&lt;/p&gt;
      &lt;button onClick={() =&gt; setCount(count + 1)}&gt;Click Me&lt;/button&gt;
    &lt;/div&gt;
  )
})

</code></pre>
<p>很明显的问题，p标签如要一同暴露，不能直接使用<code>ref={ref}</code>进行暴露，需要将p标签设置一个useRef，然后将同其他状态数据一起暴露</p>
<h2>React19</h2>
<p>在React19中，forwardRef将不再必须使用，未来版本会删除forwardRef</p>
<p>components/Footer/index.tsx</p>
<pre><code class="language-tsx">import { useState } from 'react'

export const Footer = ({props, ref}) =&gt; {
  console.log(props)
  const [count, setCount] = useState(0)
  return (
    &lt;div className=&quot;footer&quot;&gt;
      &lt;h1&gt;Footer&lt;/h1&gt;
      &lt;p ref={ref}&gt;{ count }&lt;/p&gt;
      &lt;button onClick={() =&gt; setCount(count + 1)}&gt;Click Me&lt;/button&gt;
    &lt;/div&gt;
  )
}

</code></pre>
<p>React19 发布之后，我们不应该继续使用forwardRef，应该使用最新的写法</p>
]]></content>
  <category term="JavaScript"/>
  <category term="React"/>
  <category term="TypeScript"/>
  <category term="前端"/>
  <category term="技术"/>
</entry>
<entry>
  <title>5分钟快速入门Taro</title>
  <link href="https://ganto.me/post/20240402"/>
  <id>https://ganto.me/post/20240402</id>
  <updated>2024-04-02T00:00:00+08:00</updated>
  <published>2024-04-02T00:00:00+08:00</published>
  <author><name>干徒</name></author>
  <summary><![CDATA[Taro介绍 Taro是由凹凸实验室开发的一个开放式跨端跨框架，支持使用 React/Vue/Nerv 等框架来开发 微信 / 京东 / 百度 / 支付宝 / 字节跳动 / QQ / 飞书 小程序 / H5 / RN 等应用 Taro类似于uniapp，都是跨端框架，一次开发多端部署 这是Taro官方文档，可以结合官方文档食用更佳 准备 你需要了解最基本的 HTML + CSS + JS ，俗称前端三件套 最好会使用Vue React node环境（&gt;=16.20.0） 安装Taro CLI工具 安装 npm install -g @tarojs/cli 查看是否安装成功 npm info @tarojs/cli 初始化项目 taro init myApp 进入到项目根目录，安装依赖 cd myApp pnpm i 启动项目 开发 pnpm dev:weapp 打包 pnpm build:weapp 项目启动之后，在微信开发者工具中打开该项目根目录，即可预览项目 这样Taro项目就启动起来了]]></summary>
  <content type="html"><![CDATA[<h2>Taro介绍</h2>
<p>Taro是由凹凸实验室开发的一个开放式跨端跨框架，支持使用 React/Vue/Nerv 等框架来开发 <a href="https://mp.weixin.qq.com/">微信</a> / <a href="https://mp.jd.com/?entrance=taro">京东</a> / <a href="https://smartprogram.baidu.com/">百度</a> / <a href="https://mini.open.alipay.com/">支付宝</a> / <a href="https://developer.open-douyin.com/">字节跳动</a> / <a href="https://q.qq.com/">QQ</a> / <a href="https://open.feishu.cn/document/uYjL24iN/ucDOzYjL3gzM24yN4MjN">飞书</a> 小程序 / H5 / RN 等应用</p>
<p>Taro类似于uniapp，都是跨端框架，一次开发多端部署</p>
<p>这是<a href="https://taro-docs.jd.com/">Taro官方文档</a>，可以结合官方文档食用更佳</p>
<h2>准备</h2>
<p>你需要了解最基本的 HTML + CSS + JS ，俗称前端三件套</p>
<p>最好会使用Vue React</p>
<p>node环境（&gt;=16.20.0）</p>
<h2>安装Taro CLI工具</h2>
<p>安装</p>
<pre><code class="language-sh">npm install -g @tarojs/cli

</code></pre>
<p>查看是否安装成功</p>
<pre><code class="language-sh">npm info @tarojs/cli

</code></pre>
<h2>初始化项目</h2>
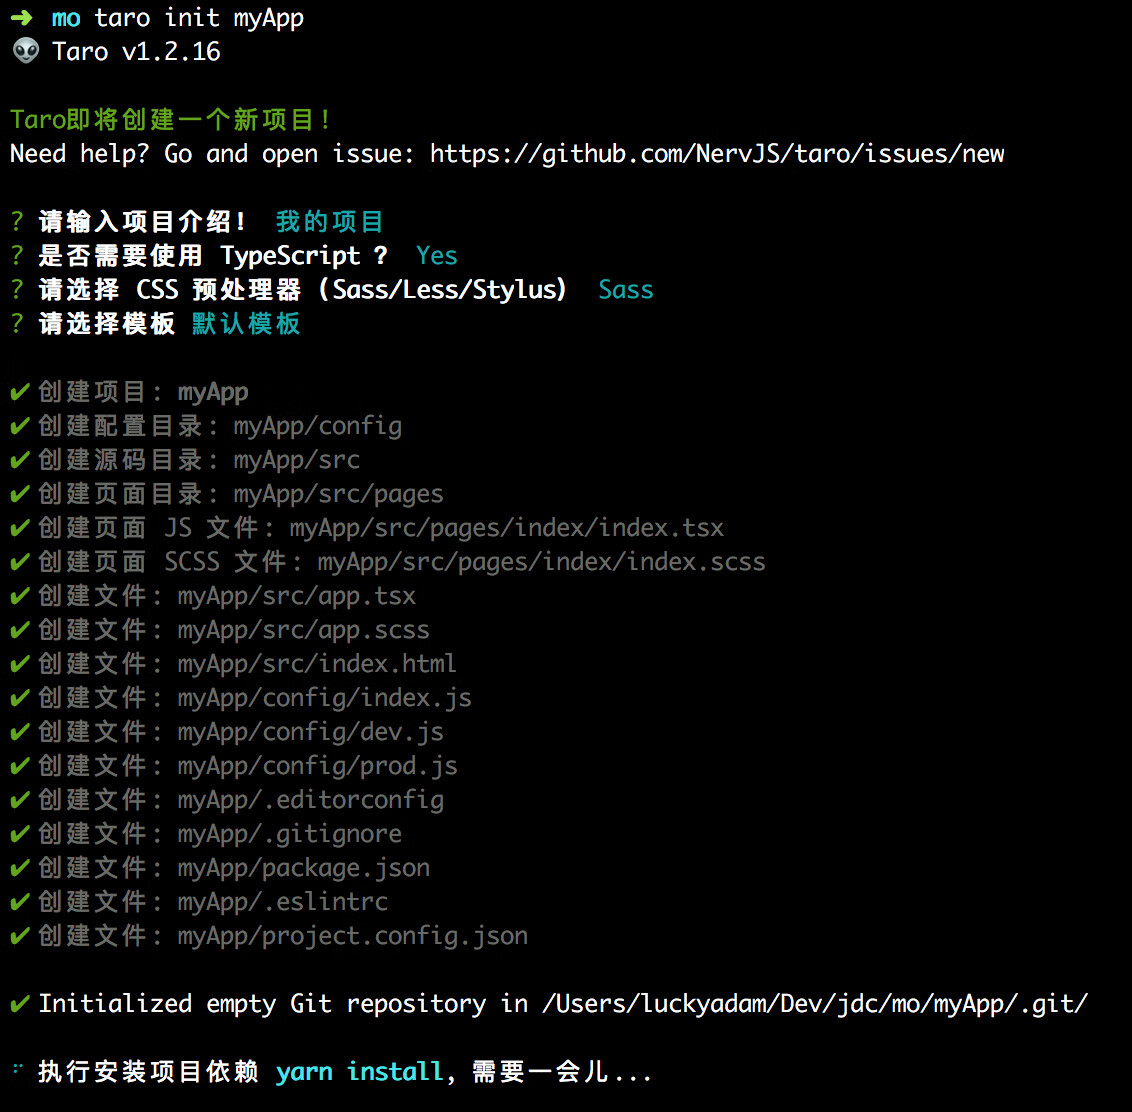
<pre><code class="language-sh">taro init myApp

</code></pre>
<p><img src="https://img30.360buyimg.com/ling/jfs/t1/121270/15/15083/672721/5f89357dEf36b7fe2/ecb98df1436cd3d5.jpg" alt="taro init myApp command screenshot" /></p>
<p>进入到项目根目录，安装依赖</p>
<pre><code class="language-sh">cd myApp

pnpm i

</code></pre>
<h2>启动项目</h2>
<p>开发</p>
<pre><code class="language-sh">pnpm dev:weapp

</code></pre>
<p>打包</p>
<pre><code class="language-sh">pnpm build:weapp

</code></pre>
<p>项目启动之后，在微信开发者工具中打开该项目根目录，即可预览项目</p>
<p>这样Taro项目就启动起来了</p>
]]></content>
  <category term="JavaScript"/>
  <category term="React"/>
  <category term="TypeScript"/>
  <category term="Vue"/>
  <category term="前端"/>
  <category term="技术"/>
</entry>
<entry>
  <title>React中使用Immer编写简洁的更新逻辑</title>
  <link href="https://ganto.me/post/20240328"/>
  <id>https://ganto.me/post/20240328</id>
  <updated>2024-03-28T00:00:00+08:00</updated>
  <published>2024-03-28T00:00:00+08:00</published>
  <author><name>干徒</name></author>
  <summary><![CDATA[在 浅谈React中的mutation 一文中，突出表达了对象和数组类型的state，不宜直接修改原对象和数组，直接修改会制造一个mutation，并且无法触发React的重新渲染 在官方文档中提到一个库 Immer ，Immer 可以让我们直接修改对象和数组。 useImmer 需要先安装use-immer库 pnpm add use-immer -D import { useImmer } from 'use-immer'; export default function App() { const [state, setState] = useImmer({ count: 0, name: 'Joe' }) const handleClick = () =&gt; { setState(draft =&gt; { draft.count += 1 }) console.log(state) } return ( &lt;div className=&quot;app&quot;&gt; &lt;h1&gt;{state.count}&lt;/h1&gt; &lt;h2&gt;{s]]></summary>
  <content type="html"><![CDATA[<p>在 <a href="https://www.cnblogs.com/ganto/articles/18098638">浅谈React中的mutation</a> 一文中，突出表达了对象和数组类型的state，不宜直接修改原对象和数组，直接修改会制造一个mutation，并且无法触发React的重新渲染</p>
<p>在官方文档中提到一个库 <a href="https://github.com/immerjs/use-immer">Immer</a> ，Immer 可以让我们直接修改对象和数组。</p>
<h2>useImmer</h2>
<p>需要先安装use-immer库</p>
<pre><code class="language-sh">pnpm add use-immer -D

</code></pre>
<pre><code class="language-jsx">import { useImmer } from 'use-immer';

export default function App() {
  const [state, setState] = useImmer({
    count: 0,
    name: 'Joe'
  })

  const handleClick = () =&gt; {
    setState(draft =&gt; {
      draft.count += 1
    })
    console.log(state)
  }

  return (
    &lt;div className=&quot;app&quot;&gt;
      &lt;h1&gt;{state.count}&lt;/h1&gt;
      &lt;h2&gt;{state.name}&lt;/h2&gt;
      &lt;button onClick={handleClick}&gt;CLICK ME&lt;/button&gt;
    &lt;/div&gt;
  )
}

</code></pre>
<h2>useState</h2>
<pre><code class="language-jsx">import { useState } from 'react';

export default function App() {
  const [state, setState] = useState({
    count: 0,
    name: 'Joe'
  })

  const handleClick = () =&gt; {
    setState(obj =&gt; {
      obj.count += 1
      return obj // setState的参数-匿名函数需要有返回值
    })
    console.log(state) // 此处的打印结果并非最新的state，但是依然能反应出state已被修改
  }

  return (
    &lt;div className=&quot;app&quot;&gt;
      &lt;h1&gt;{state.count}&lt;/h1&gt;
      &lt;h2&gt;{state.name}&lt;/h2&gt;
      &lt;button onClick={handleClick}&gt;CLICK ME&lt;/button&gt;
    &lt;/div&gt;
  )
}

</code></pre>
]]></content>
  <category term="JavaScript"/>
  <category term="React"/>
  <category term="前端"/>
  <category term="技术"/>
</entry>
<entry>
  <title>浅谈React中的mutation</title>
  <link href="https://ganto.me/post/20240327"/>
  <id>https://ganto.me/post/20240327</id>
  <updated>2024-03-27T00:00:00+08:00</updated>
  <published>2024-03-27T00:00:00+08:00</published>
  <author><name>干徒</name></author>
  <summary><![CDATA[官方文档：保持组件纯粹、更新 state 中的对象、更新 state 中的数组 保持组件纯粹 这里说的纯粹也就是JS中的纯函数 那么，什么是纯函数？ 纯函数 通常具有如下特征（摘自React官网）： **只负责自己的任务。**它不会更改在该函数调用前就已存在的对象或变量。 **输入相同，则输出相同。**给定相同的输入，纯函数应总是返回相同的结果。 只负责自己的任务 简单点说就是不应该有任何副作用； 输入相同，则输出相同 就是字面意思，函数输入的参数相同的情况下，输出的内容一定是相同的； 函数满足以上两点，那么该函数就可以被成为纯函数。 就如以下代码（官网示例进行简化）： function Recipe({ drinkers }) { return ( &lt;ol&gt; &lt;li&gt;drinkers: {drinkers}&lt;/li&gt; &lt;li&gt;drinkers: {drinkers}; 0.5 * drinkers: {0.5 * drinkers}&lt;/li&gt; &lt;li&gt;0.5 * drinkers: {0.5 * drinkers]]></summary>
  <content type="html"><![CDATA[<blockquote>
<p>官方文档：<a href="https://zh-hans.react.dev/learn/keeping-components-pure">保持组件纯粹</a>、<a href="https://zh-hans.react.dev/learn/updating-objects-in-state">更新 state 中的对象</a>、<a href="https://zh-hans.react.dev/learn/updating-arrays-in-state">更新 state 中的数组</a></p>
</blockquote>
<h1>保持组件纯粹</h1>
<p>这里说的纯粹也就是JS中的纯函数</p>
<p>那么，什么是纯函数？</p>
<p>纯函数 通常具有如下特征（摘自React官网）：</p>
<ul>
<li>**只负责自己的任务。**它不会更改在该函数调用前就已存在的对象或变量。</li>
<li>**输入相同，则输出相同。**给定相同的输入，纯函数应总是返回相同的结果。</li>
</ul>
<p><em><strong>只负责自己的任务</strong></em> 简单点说就是不应该有任何副作用；<br />
<em><strong>输入相同，则输出相同</strong></em> 就是字面意思，函数输入的参数相同的情况下，输出的内容一定是相同的；<br />
函数满足以上两点，那么该函数就可以被成为<em><strong>纯函数</strong></em>。</p>
<p>就如以下代码（官网示例进行简化）：</p>
<pre><code class="language-jsx">function Recipe({ drinkers }) {
  return (
    &lt;ol&gt;    
      &lt;li&gt;drinkers: {drinkers}&lt;/li&gt;
      &lt;li&gt;drinkers: {drinkers}; 0.5 * drinkers: {0.5 * drinkers}&lt;/li&gt;
      &lt;li&gt;0.5 * drinkers: {0.5 * drinkers}&lt;/li&gt;
    &lt;/ol&gt;
  );
}

export default function App() {
  return (
    &lt;section&gt;
      &lt;Recipe drinkers={2} /&gt;
      &lt;Recipe drinkers={4} /&gt;
    &lt;/section&gt;
  );
}

</code></pre>
<p>以上代码中的<code>Recipe</code>组件就是一个纯粹的组件，因为<code>Recipe</code>函数是一个纯函数，在参数<code>drinkers</code>的值固定的情况下，那么<code>{drinkers}</code> <code>{0.5 * drinkers}</code>将永恒不变</p>
<p>官网有这么一段话，强调组件应当保持纯粹：React 的渲染过程必须自始至终是纯粹的。组件应该只 返回 它们的 JSX，而不 改变 在渲染前，就已存在的任何对象或变量 — 这将会使它们变得不纯粹！<br />
并且给出了反例：</p>
<pre><code class="language-jsx">let guest = 0;

function Cup() {
  // Bad：正在更改预先存在的变量！
  guest = guest + 1;
  return &lt;h2&gt;Tea cup for guest #{guest}&lt;/h2&gt;;
}

export default function TeaSet() {
  return (
    &lt;&gt;
      &lt;Cup /&gt;
      &lt;Cup /&gt;
      &lt;Cup /&gt;
    &lt;/&gt;
  );
}

</code></pre>
<p><code>Cup</code>组件正在读写其外部声明的 guest 变量，多次调用该组件会产生不同的结果，而<code>Cup</code>组件的结果将变的无法预测</p>
<p>React官网将这种 <code>组件改变了 预先存在的 变量的值</code> 的现象称为 突变（mutation）</p>
<h1>更新 state 中的对象</h1>
<p>在state中可以存放JavaScript中的任何值，这些值应该是不可变的（immutable），它们不能被改变或是只读的。</p>
<p>如以下代码:</p>
<pre><code class="language-jsx">const [count, setCount] = useState(0)
setCount(1)

</code></pre>
<p>count从0到1，其本质是新创建了一个数字1覆盖掉了数字0，0本身并没有改变<br />
如果你了解JS中的辟栈内，那么你应该了解，0和1并非是同一个变量，而是存在栈内存中的两个不相关的内存空间</p>
<p>如果你了解了上面的内容，你大致也能猜到JS中的对象应该如何更新状态</p>
<pre><code class="language-jsx">const [obj, setObj] = useState({name: &quot;张三&quot;, age: 19})
const changeObj = () =&gt; {
  obj.name = &quot;李四&quot;
  setObj(obj)
}

</code></pre>
<p>以上的代码对吗？很显然不对，在一开始就已经说过 在state中可以存放JavaScript中的任何值，这些值应该是不可变的（immutable），它们不能被改变或是只读的。</p>
<p><code>obj.name = &quot;李四&quot;</code>这段代码就会制造一个<strong>mutation</strong></p>
<p>如果运行以上代码，显然不会触发重新渲染，可以将其修改为以下代码</p>
<pre><code class="language-jsx">const [obj, setObj] = useState({name: &quot;张三&quot;, age: 19})
const changeObj = () =&gt; {
  setObj({...obj, name: &quot;李四&quot;})
}

</code></pre>
<p>现在一切完美</p>
<h1>更新 state 中的数组</h1>
<p>数组是特殊的对象，我们依然要在没有 mutation 的前提下更新数组<br />
我们应该遵循一个原则，不改变原数组，要利用原数组产生一个新数组，进而利用新数组去修改状态</p>
<table>
<thead>
<tr>
<th></th>
<th>避免使用 (会改变原始数组)</th>
<th>推荐使用 (会返回一个新数组）</th>
</tr>
</thead>
<tbody>
<tr>
<td>添加元素</td>
<td>push，unshift</td>
<td>concat，[...arr] 展开语法（<a href="https://zh-hans.react.dev/learn/updating-arrays-in-state#adding-to-an-array">例子</a>）</td>
</tr>
<tr>
<td>删除元素</td>
<td>pop，shift，splice</td>
<td>filter，slice（<a href="https://zh-hans.react.dev/learn/updating-arrays-in-state#removing-from-an-array">例子</a>）</td>
</tr>
<tr>
<td>替换元素</td>
<td>splice，arr[i] = ... 赋值</td>
<td>map（<a href="https://zh-hans.react.dev/learn/updating-arrays-in-state#replacing-items-in-an-array">例子</a>）</td>
</tr>
<tr>
<td>排序</td>
<td>reverse，sort</td>
<td>先将数组复制一份（<a href="https://zh-hans.react.dev/learn/updating-arrays-in-state#making-other-changes-to-an-array">例子</a>）</td>
</tr>
</tbody>
</table>
]]></content>
  <category term="JavaScript"/>
  <category term="React"/>
  <category term="技术"/>
</entry>
<entry>
  <title>Go语言高并发编程初探</title>
  <link href="https://ganto.me/post/20240326"/>
  <id>https://ganto.me/post/20240326</id>
  <updated>2024-03-26T00:00:00+08:00</updated>
  <published>2024-03-26T00:00:00+08:00</published>
  <author><name>干徒</name></author>
  <summary><![CDATA[在当今这个数据爆炸的时代，高并发编程已成为开发者们必须掌握的技能之一。Go语言，由于其出色的并发支持和简洁的语法，正逐渐成为高并发编程领域的热门选择。本文将带您走进Go语言高并发编程的世界，探索其中的奥秘。 一、Go语言的并发模型 Go语言采用了CSP（Communicating Sequential Processes）并发模型，即通过通道（channel）在协程（goroutine）之间进行通信。协程是Go语言实现并发的基本单位，它们比线程更轻量级，可以创建成千上万个而不会给系统带来太大负担。通道则用于协程之间的数据传递，使得并发编程更加安全、高效。 二、创建与管理协程 在Go语言中，使用go关键字可以轻松地创建协程。例如： package main import &quot;fmt&quot; func main() { go sayHello() // 创建协程执行sayHello函数 fmt.Println(&quot;Main function continues...&quot;) } func sayHello() { fmt.Println(&quot;Hello f]]></summary>
  <content type="html"><![CDATA[<p>在当今这个数据爆炸的时代，高并发编程已成为开发者们必须掌握的技能之一。Go语言，由于其出色的并发支持和简洁的语法，正逐渐成为高并发编程领域的热门选择。本文将带您走进Go语言高并发编程的世界，探索其中的奥秘。</p>
<p><strong>一、Go语言的并发模型</strong></p>
<p>Go语言采用了CSP（Communicating Sequential Processes）并发模型，即通过通道（channel）在协程（goroutine）之间进行通信。协程是Go语言实现并发的基本单位，它们比线程更轻量级，可以创建成千上万个而不会给系统带来太大负担。通道则用于协程之间的数据传递，使得并发编程更加安全、高效。</p>
<p><strong>二、创建与管理协程</strong></p>
<p>在Go语言中，使用<code>go</code>关键字可以轻松地创建协程。例如：</p>
<pre><code class="language-go">package main

import &quot;fmt&quot;

func main() {
    go sayHello() // 创建协程执行sayHello函数
    fmt.Println(&quot;Main function continues...&quot;)
}

func sayHello() {
    fmt.Println(&quot;Hello from goroutine!&quot;)
}

</code></pre>
<p>在上面的代码中，我们创建了一个协程来执行<code>sayHello</code>函数。需要注意的是，由于协程是异步执行的，因此主函数可能会先于协程完成。如果需要等待协程执行完成，可以使用<code>sync.WaitGroup</code>或其他同步机制。</p>
<p><strong>三、通道的使用</strong></p>
<p>通道是Go语言并发编程中的核心概念。它用于协程之间的数据传递和同步。通道是有类型的，可以传递指定类型的值。通道的创建可以使用<code>make</code>函数，并通过<code>&lt;-</code>操作符进行发送和接收操作。</p>
<p>下面是一个简单的示例，演示了如何使用通道进行协程间的数据传递：</p>
<pre><code class="language-go">package main

import &quot;fmt&quot;

func main() {
    ch := make(chan string) // 创建一个字符串类型的通道
    go func() {
        ch &lt;- &quot;Hello from goroutine!&quot; // 向通道发送数据
    }()
    msg := &lt;-ch // 从通道接收数据
    fmt.Println(msg) // 输出：Hello from goroutine!
}

</code></pre>
<p>在上面的代码中，我们创建了一个字符串类型的通道<code>ch</code>，并在协程中向该通道发送了一条消息。然后，主函数从通道中接收并打印了这条消息。通过这种方式，我们实现了协程之间的数据传递。</p>
<p><strong>四、处理并发冲突</strong></p>
<p>在高并发编程中，经常会出现多个协程同时访问共享资源的情况，这可能导致数据不一致或其他并发冲突。为了解决这个问题，Go语言提供了互斥锁（mutex）和原子操作等机制。</p>
<p>互斥锁用于保护共享资源，确保同一时间只有一个协程可以访问该资源。例如：</p>
<pre><code class="language-go">import (
    &quot;fmt&quot;
    &quot;sync&quot;
)

var (
    counter int
    mutex   sync.Mutex
)

func increment() {
    mutex.Lock() // 加锁
    defer mutex.Unlock() // 延迟解锁，确保在函数返回前释放锁
    counter++
}

func main() {
    // 启动多个协程执行increment函数
    for i := 0; i &lt; 1000; i++ {
        go increment()
    }
    // 等待所有协程执行完毕
    // ...（省略等待逻辑）
    fmt.Println(&quot;Final counter:&quot;, counter) // 输出最终的计数器值
}

</code></pre>
<p>在上面的代码中，我们使用<code>sync.Mutex</code>来保护<code>counter</code>变量，确保在增加计数时不会出现并发冲突。</p>
<p><strong>五、总结</strong></p>
<p>Go语言以其简洁的语法和强大的并发支持，成为高并发编程领域的佼佼者。通过掌握Go语言的并发模型和通道机制，我们可以轻松地编写出高效、安全的并发程序。当然，高并发编程是一个复杂的领域，还需要结合具体的业务场景和需求进行深入的探索和实践。希望本文能为您在Go语言高并发编程的道路上提供一些启示和帮助。</p>
]]></content>
  <category term="AI"/>
  <category term="Golang"/>
  <category term="后端"/>
  <category term="高并发"/>
  <category term="技术"/>
</entry>
<entry>
  <title>windows终端命令受限</title>
  <link href="https://ganto.me/post/20240315"/>
  <id>https://ganto.me/post/20240315</id>
  <updated>2024-03-15T00:00:00+08:00</updated>
  <published>2024-03-15T00:00:00+08:00</published>
  <author><name>干徒</name></author>
  <summary><![CDATA[在windows系统上，通过以下命令安装pnpm包管理工具，然后在终端执行pnpm -v会报错 npm install -g pnpm pnpm -v # 报错 运行get-ExecutionPolicy，显示Restricted（受限的） get-ExecutionPolicy Restricted 运行set-ExecutionPolicy RemoteSigned，设置RemoteSigned set-ExecutionPolicy RemoteSigned 再次查看 get-ExecutionPolicy RemoteSigned]]></summary>
  <content type="html"><![CDATA[<p>在windows系统上，通过以下命令安装pnpm包管理工具，然后在终端执行<code>pnpm -v</code>会报错</p>
<pre><code class="language-sh">npm install -g pnpm

pnpm -v # 报错

</code></pre>
<p>运行get-ExecutionPolicy，显示Restricted（受限的）</p>
<pre><code class="language-sh">get-ExecutionPolicy
Restricted

</code></pre>
<p>运行set-ExecutionPolicy RemoteSigned，设置RemoteSigned</p>
<pre><code class="language-sh">set-ExecutionPolicy RemoteSigned

</code></pre>
<p>再次查看</p>
<pre><code class="language-sh">get-ExecutionPolicy
RemoteSigned

</code></pre>
]]></content>
  <category term="Windows"/>
  <category term="技术"/>
</entry>
<entry>
  <title>TypeScript类型取反</title>
  <link href="https://ganto.me/post/20240313"/>
  <id>https://ganto.me/post/20240313</id>
  <updated>2024-03-13T00:00:00+08:00</updated>
  <published>2024-03-13T00:00:00+08:00</published>
  <author><name>干徒</name></author>
  <summary><![CDATA[读码见意 function func(arg: number) {} func(1) func(&quot;zs&quot;) // ERROR Argument of type 'string' is not assignable to parameter of type 'number'. 如想要将函数参数定义为非number的其他类型，则可以这样 function func&lt;T&gt;(arg: T extends number ? never : T) {} func(1) // ERROR Argument of type 'number' is not assignable to parameter of type 'never'. func(&quot;zs&quot;) func(true) func([]) func({}) func(() =&gt; {}) 写成一个通用的type类型 type negationType&lt;T, U&gt; = T extends U ? never : T function func&lt;T&gt;(arg: nega]]></summary>
  <content type="html"><![CDATA[<p>读码见意</p>
<pre><code class="language-ts">function func(arg: number) {}
func(1)
func(&quot;zs&quot;) // ERROR Argument of type 'string' is not assignable to parameter of type 'number'.

</code></pre>
<p>如想要将函数参数定义为非number的其他类型，则可以这样</p>
<pre><code class="language-ts">function func&lt;T&gt;(arg: T extends number ? never : T) {}
func(1) // ERROR Argument of type 'number' is not assignable to parameter of type 'never'.
func(&quot;zs&quot;)
func(true)
func([])
func({})
func(() =&gt; {})

</code></pre>
<p>写成一个通用的type类型</p>
<pre><code class="language-ts">type negationType&lt;T, U&gt; = T extends U ? never : T
function func&lt;T&gt;(arg: negationType&lt;T, number&gt;) {}
func(1) // ERROR Argument of type 'number' is not assignable to parameter of type 'never'.
func(&quot;zs&quot;)
func(true)
func([])
func({})
func(() =&gt; {})

</code></pre>
]]></content>
  <category term="TypeScript"/>
  <category term="技术"/>
</entry>
<entry>
  <title>实现一个丝滑的暗黑模式切换动画</title>
  <link href="https://ganto.me/post/20240102"/>
  <id>https://ganto.me/post/20240102</id>
  <updated>2024-01-02T00:00:00+08:00</updated>
  <published>2024-01-02T00:00:00+08:00</published>
  <author><name>干徒</name></author>
  <summary><![CDATA[体验：https://ganto.me 参考内容： 参考文章：https://juejin.cn/post/7269388083342082107 MDN：https://developer.mozilla.org/zh-CN/docs/Web/API/View_Transitions_API https://developer.mozilla.org/zh-CN/docs/Web/CSS/::view-transition-new 实现方式就是利用vueuse将html元素动态添加class类名dark 利用伪元素::view-transition-old以及::view-transition-new，如需了解这两个伪元素，请移步文章开头参考内容 可以这样理解，调用document.startViewTransition(() =&gt; { /* 修改html元素类名 */ })方法时，在该方法的回调函数中，添加修改页面变化的代码； 这样伪元素::view-transition-old记录的就是修改之前的页面'截图'，而伪元素::view-transition-new是修改页面变化]]></summary>
  <content type="html"><![CDATA[<blockquote>
<p>体验：<a href="https://ganto.me">https://ganto.me</a></p>
</blockquote>
<blockquote>
<p>参考内容：<br />
参考文章：<a href="https://juejin.cn/post/7269388083342082107">https://juejin.cn/post/7269388083342082107</a><br />
MDN：<a href="https://developer.mozilla.org/zh-CN/docs/Web/API/View_Transitions_API">https://developer.mozilla.org/zh-CN/docs/Web/API/View_Transitions_API</a> <a href="https://developer.mozilla.org/zh-CN/docs/Web/CSS/::view-transition-new">https://developer.mozilla.org/zh-CN/docs/Web/CSS/::view-transition-new</a></p>
</blockquote>
<p>实现方式就是利用vueuse将html元素动态添加class类名dark</p>
<p>利用伪元素<code>::view-transition-old</code>以及<code>::view-transition-new</code>，如需了解这两个伪元素，请移步文章开头参考内容</p>
<p>可以这样理解，调用<code>document.startViewTransition(() =&gt; { /* 修改html元素类名 */ })</code>方法时，在该方法的回调函数中，添加修改页面变化的代码；<br />
这样伪元素<code>::view-transition-old</code>记录的就是修改之前的页面'截图'，而伪元素<code>::view-transition-new</code>是修改页面变化后的页面，然后是这两个伪元素进行的动画过渡</p>
<p>如果你想快速在项目中添加该动画，请添加以下代码<br />
*css</p>
<pre><code class="language-css">html {
  --g-tabbar-border: #c9c9c9;
  --g-tabbar-item-after: #595959;
  --g-about-link-border: #c9c9c9;
  --g-about-link-hover: #374151;
  --g-blog-bg-color: #d4d4d4;
}
html.dark {
  --g-tabbar-border: #595959;
  --g-tabbar-item-after: #fff;
  --g-about-link-border: #374151;
  --g-about-link-hover: #fff;
  --g-blog-bg-color: #8a8a8a;
}

::view-transition-old(*) {
  animation: none;
}

::view-transition-new(*) {
  animation: clip .5s ease-in;
}

::view-transition-old(root) {
  z-index: 1;
}

::view-transition-new(root) {
  z-index: 9999;
}

html.dark::view-transition-old(*) {
  animation: clip .5s ease-in reverse;
}

html.dark::view-transition-new(*) {
  animation: none;
}

html.dark::view-transition-old(root) {
  z-index: 9999;
}

html.dark::view-transition-new(root) {
  z-index: 1;
}

@keyframes clip {
  from {
    clip-path: circle(0% at var(--x) var(--y));
  }
  to{
    clip-path: circle(var(--r) at var(--x) var(--y));
  }
}

</code></pre>
<p><code>clip-path</code> css样式中的 <code>circle</code> 函数，第一个参数就是圆的半径，第二、三个参数是圆心坐标</p>
<p>*js</p>
<pre><code class="language-js">const changeBtn = (func, $eve) =&gt; {
  const x = $eve.clientX
  const y = $eve.clientY
  // 计算鼠标点击位置距离视窗的最大圆半径
  const endRadius = Math.hypot(
    Math.max(x, innerWidth - x),
    Math.max(y, innerHeight - y),
  )
  document.documentElement.style.setProperty('--x', x + 'px')
  document.documentElement.style.setProperty('--y', y + 'px')
  document.documentElement.style.setProperty('--r', endRadius + 'px')
  // 判断浏览器是否支持document.startViewTransition
  if (document.startViewTransition) {
    // 如果支持就使用document.startViewTransition方法
    document.startViewTransition(() =&gt; {
      func.call() // 这里的函数是切换主题的函数，调用changeBtn函数时进行传入
    })
  } else {
    // 如果不支持，就使用最原始的方式，切换主题
    func.call()
  }
}

</code></pre>
<p>动画会用到鼠标点击按钮时的点击坐标</p>
<p>如果你想快速测试，在添加css代码后，直接在浏览器控制台Console中运行以下代码测试</p>
<p>*测试</p>
<pre><code class="language-js">document.querySelector('html').setAttribute('style', '--r: 100px; --x: 100px; --y: 100px;')
document.startViewTransition(() =&gt; {
    document.querySelector('html').classList.toggle('dark')
})

</code></pre>
<h1>完整案例</h1>
<pre><code class="language-html">&lt;!DOCTYPE html&gt;
&lt;html lang=&quot;en&quot;&gt;
  &lt;head&gt;
    &lt;meta charset=&quot;UTF-8&quot; /&gt;
    &lt;meta name=&quot;viewport&quot; content=&quot;width=device-width, initial-scale=1.0&quot; /&gt;
    &lt;title&gt;Document&lt;/title&gt;
    &lt;style&gt;
      html {
        --bg-color: #000;
        --text-color: #fff;
      }
      html.dark {
        --bg-color: #fff;
        --text-color: #000;
      }

      ::view-transition-old(*) {
        animation: none;
      }

      ::view-transition-new(*) {
        animation: clip 0.5s ease-in;
      }

      ::view-transition-old(root) {
        z-index: 1;
      }

      ::view-transition-new(root) {
        z-index: 9999;
      }

      html.dark::view-transition-old(*) {
        animation: clip 0.5s ease-in reverse;
      }

      html.dark::view-transition-new(*) {
        animation: none;
      }

      html.dark::view-transition-old(root) {
        z-index: 9999;
      }

      html.dark::view-transition-new(root) {
        z-index: 1;
      }

      @keyframes clip {
        from {
          clip-path: circle(0% at var(--x) var(--y));
        }
        to {
          clip-path: circle(var(--r) at var(--x) var(--y));
        }
      }

      /* 样式写法例子，使用css变量，可以实现动态切换主题 */
      body {
        background-color: var(--bg-color);
        color: var(--text-color);
      }
    &lt;/style&gt;
  &lt;/head&gt;
  &lt;body&gt;
    &lt;h1&gt;
      test text
    &lt;/h1&gt;
    &lt;button id=&quot;btn&quot;&gt;changeTheme&lt;/button&gt;

    &lt;script&gt;
      // 主题切换函数
      const changeTheme = () =&gt; {
        document.querySelector('html').classList.toggle('dark')
      }
      const changeBtn = (func, $eve) =&gt; {
        const x = $eve.clientX
        const y = $eve.clientY
        // 计算鼠标点击位置距离视窗的最大圆半径
        const endRadius = Math.hypot(
          Math.max(x, innerWidth - x),
          Math.max(y, innerHeight - y),
        )
        document.documentElement.style.setProperty('--x', x + 'px')
        document.documentElement.style.setProperty('--y', y + 'px')
        document.documentElement.style.setProperty('--r', endRadius + 'px')
        // 判断浏览器是否支持document.startViewTransition
        if (document.startViewTransition) {
          // 如果支持就使用document.startViewTransition方法
          document.startViewTransition(() =&gt; {
            func.call() // 这里的函数是切换主题的函数，调用changeBtn函数时进行传入
          })
        } else {
          // 如果不支持，就使用最原始的方式，切换主题
          func.call()
        }
      }
      document.getElementById('btn').addEventListener('click', (e) =&gt; {
        changeBtn(changeTheme, e)
      })
    &lt;/script&gt;
  &lt;/body&gt;
&lt;/html&gt;

</code></pre>
]]></content>
  <category term="Vue"/>
  <category term="前端"/>
  <category term="技术"/>
</entry>
<entry>
  <title>Vue3.3+ 新特性 defineOptions</title>
  <link href="https://ganto.me/post/20231221-2"/>
  <id>https://ganto.me/post/20231221-2</id>
  <updated>2023-12-21T00:00:00+08:00</updated>
  <published>2023-12-21T00:00:00+08:00</published>
  <author><name>干徒</name></author>
  <summary><![CDATA[defineOptions是一个宏，是在Vue3.3+中新增的新特性 defineOptions配置项 name 在Vue3.3之前，组件的默认组件名为.vue单文件组件[SFC]文件的名字，如果需要修改组件名则需要结合Options API进行配置 &lt;!-- src/components/Com.vue --&gt; &lt;script setup&gt; &lt;/script&gt; &lt;script&gt; export default { name: 'ComponentName' } &lt;/script&gt; &lt;template&gt; &lt;div&gt;Com Component&lt;/div&gt; &lt;/template&gt; 在以上的代码中，写了两个script标签，一个标签写Composition API代码，一个标签以Options API的方式配置组件名 虽然可以配置组件名，但是这种处理方式很不好 在Vue3.3+新增的defineOptions宏，可以很好的解决这个问题 &lt;!-- src/components/Com]]></summary>
  <content type="html"><![CDATA[<p><code>defineOptions</code>是一个宏，是在Vue3.3+中新增的新特性</p>
<h1>defineOptions配置项</h1>
<h2>name</h2>
<p>在Vue3.3之前，组件的默认组件名为.vue单文件组件[SFC]文件的名字，如果需要修改组件名则需要结合Options API进行配置</p>
<pre><code class="language-vue">&lt;!-- src/components/Com.vue --&gt;
&lt;script setup&gt;

&lt;/script&gt;

&lt;script&gt;
export default {
  name: 'ComponentName'
}
&lt;/script&gt;

&lt;template&gt;
  &lt;div&gt;Com Component&lt;/div&gt;
&lt;/template&gt;

</code></pre>
<p>在以上的代码中，写了两个script标签，一个标签写Composition API代码，一个标签以Options API的方式配置组件名<br />
虽然可以配置组件名，但是这种处理方式很不好</p>
<p>在Vue3.3+新增的defineOptions宏，可以很好的解决这个问题</p>
<pre><code class="language-vue">&lt;!-- src/components/Com.vue --&gt;
&lt;script setup&gt;
defineOptions({
  name: 'ComponentName'
})
&lt;/script&gt;

&lt;template&gt;
  &lt;div&gt;Com Component&lt;/div&gt;
&lt;/template&gt;

</code></pre>
<p>在以上代码中可以看到，defineOptions是全局的宏，无需导入</p>
<h2>inheritAttrs</h2>
<p>在Vue中如果在组件标签上添加属性，则会被透传到组件的根标签上，<em>在Vue3中，组件的根标签可以存在多个，如果根标签存在多个，那么透传将失效</em></p>
<pre><code class="language-vue">&lt;!-- src/App.vue --&gt;
&lt;script setup&gt;
import Com from './components/Com.vue'
&lt;/script&gt;

&lt;template&gt;
  &lt;Com class=&quot;comComponentClassName&quot; /&gt;
&lt;/template&gt;

</code></pre>
<pre><code class="language-vue">&lt;!-- src/components/Com.vue --&gt;
&lt;script setup&gt;
defineOptions({
  name: 'ComponentName',
})
&lt;/script&gt;

&lt;template&gt;
  &lt;div&gt;Com Component&lt;/div&gt;
&lt;/template&gt;

</code></pre>
<p>解析后的代码</p>
<pre><code class="language-html">&lt;div id=&quot;app&quot; data-v-app=&quot;&quot;&gt;
  &lt;div class=&quot;comComponentClassName&quot;&gt;Com Component&lt;/div&gt;
&lt;/div&gt;

</code></pre>
<p>有时在开发中，并不希望组件存在透传行为，我们可以通过配置进行关闭</p>
<pre><code class="language-vue">&lt;!-- src/components/Com.vue --&gt;
&lt;script setup&gt;
defineOptions({
  name: 'ComponentName',
})
&lt;/script&gt;

&lt;script&gt;
export default {
  inheritAttrs: false
}
&lt;/script&gt;

&lt;template&gt;
  &lt;div&gt;Com Component&lt;/div&gt;
&lt;/template&gt;

</code></pre>
<p>以上代码，在Vue3.3之前，如需配置组件禁用透传，那么配置方式和配置组件名一样，需要在单独的script写Options API配置项</p>
<p>在Vue3.3+可以通过defineOptions宏进行配置</p>
<pre><code class="language-vue">&lt;!-- src/components/Com.vue --&gt;
&lt;script setup&gt;
defineOptions({
  name: 'ComponentName',
  inheritAttrs: false,
})
&lt;/script&gt;

&lt;template&gt;
  &lt;div&gt;Com Component&lt;/div&gt;
&lt;/template&gt;

</code></pre>
<p><code>defineOptions</code>宏还可以配置其他内容，具体内容请查看官方文档 <a href="https://cn.vuejs.org/api/sfc-script-setup.html#defineoptions">https://cn.vuejs.org/api/sfc-script-setup.html#defineoptions</a></p>
]]></content>
  <category term="JavaScript"/>
  <category term="Vue"/>
  <category term="前端"/>
  <category term="技术"/>
</entry>
<entry>
  <title>Vue3 实验性特性 defineModel</title>
  <link href="https://ganto.me/post/20231221"/>
  <id>https://ganto.me/post/20231221</id>
  <updated>2023-12-21T00:00:00+08:00</updated>
  <published>2023-12-21T00:00:00+08:00</published>
  <author><name>干徒</name></author>
  <summary><![CDATA[在Vue3.4中，defineModel宏已经被正式启用，无需配置，直接可用 启用defineModel 目前[Vue3.3.13]defineModel宏是实验性特性，如果需要使用该宏，需要在vite.config.js配置以下内容 export default defineConfig({ plugins: [ vue({ script: { defineModel: true } }), ], }) 因为是实验性功能，在运行项目时，会有提示 [@vue/compiler-sfc] defineModel() is an experimental feature and disabled by default. To enable it, follow the RFC at https://github.com/vuejs/rfcs/discussions/503. defineModel出现的必要 在Vue中，父传子的数据是单向数据流，即无法直接通过子组件修改父组件传递过来的数据 如果需要修改可以通过自定义事件的方式，通过子组件的自定义事件来修改父组件的状态 &lt;!-- sr]]></summary>
  <content type="html"><![CDATA[<blockquote>
<p>在Vue3.4中，defineModel宏已经被正式启用，无需配置，直接可用</p>
</blockquote>
<h1>启用defineModel</h1>
<p>目前[Vue3.3.13]defineModel宏是实验性特性，如果需要使用该宏，需要在<code>vite.config.js</code>配置以下内容</p>
<pre><code class="language-js">export default defineConfig({
  plugins: [
    vue({
      script: {
        defineModel: true
      }
    }),
  ],
})

</code></pre>
<p>因为是实验性功能，在运行项目时，会有提示</p>
<blockquote>
<p>[@vue/compiler-sfc] defineModel() is an experimental feature and disabled by default.<br />
To enable it, follow the RFC at <a href="https://github.com/vuejs/rfcs/discussions/503">https://github.com/vuejs/rfcs/discussions/503</a>.</p>
</blockquote>
<h1>defineModel出现的必要</h1>
<p>在Vue中，父传子的数据是单向数据流，即无法直接通过子组件修改父组件传递过来的数据<br />
如果需要修改可以通过自定义事件的方式，通过子组件的自定义事件来修改父组件的状态</p>
<pre><code class="language-vue">&lt;!-- src/App.vue --&gt;
&lt;script setup&gt;
import { ref } from 'vue'
import Counter from './components/Counter.vue'

const count = ref(0)
const updateCount = (val) =&gt; {
  count.value = val
}
&lt;/script&gt;

&lt;template&gt;
  &lt;div&amp;gt;父组件：{{ count }}&lt;/div&gt;
  &lt;Counter :count=&quot;count&quot; @addCount=&quot;updateCount&quot;/&gt;
&lt;/template&gt;

</code></pre>
<pre><code class="language-vue">&lt;!-- src/components/Counter.vue --&gt;
&lt;script setup&gt;
const props = defineProps({
  count: Number
})

const emit = defineEmits([&quot;addCount&quot;])

const handleClick = () =&gt; {
  emit(&quot;addCount&quot;, props.count+1)
}
&lt;/script&gt;

&lt;template&gt;
  &lt;div&amp;gt;子组件：{{ count }}&lt;/div&gt;
  &lt;button @click=&quot;handleClick&quot;&gt;count+1&lt;/button&gt;
&lt;/template&gt;

</code></pre>
<p>以上代码可以实现子组件修改父组件的状态，虽然不算复杂，也很好理解原理，但是这并不优雅</p>
<p>可以通过v-model来进一步简化代码，以下代码父组件并不是通过属性的方式将数据传递给子组件，而是通过v-model进行传递<br />
子组件的代码量基本和上边的代码一致，只是自定义事件名变成了<code>update:count</code>的形式，这是固定写法<br />
父组件无需注册子组件的自定义事件</p>
<pre><code class="language-vue">&lt;!-- src/App.vue --&gt;
&lt;script setup&gt;
import { ref } from 'vue'
import Counter from './components/Counter.vue'
const count = ref(0)
&lt;/script&gt;

&lt;template&gt;
  &lt;div&amp;gt;父组件：{{ count }}&lt;/div&gt;
  &lt;Counter v-model:count=&quot;count&quot;/&gt;
&lt;/template&gt;

</code></pre>
<blockquote>
<p>如果父组件直接写<code>v-model=&quot;count&quot;</code>，其实可以理解为默认转换为<code>v-model:modelValue=&quot;count&quot;</code>，即：<code>:modelValue=&quot;count&quot;</code> <code>@update:modelValue=&quot;count&quot;</code><br />
子组件中需要props接收<code>modelValue</code>，自定义事件将变为<code>update:modelValue</code></p>
</blockquote>
<pre><code class="language-vue">&lt;!-- src/components/Counter.vue --&gt;
&lt;script setup&gt;
const props = defineProps({
  count: Number
})

const emit = defineEmits([&quot;update:count&quot;])

const handleClick = () =&gt; {
  emit(&quot;update:count&quot;, props.count+1)
}
&lt;/script&gt;

&lt;template&gt;
  &lt;div&amp;gt;子组件：{{ count }}&lt;/div&gt;
  &lt;button @click=&quot;handleClick&quot;&gt;count+1&lt;/button&gt;
&lt;/template&gt;

</code></pre>
<p>虽然简化了父组件的代码，但是子组件的代码量并没有减少，并且子组件自定义事件名变成了固定格式的写法<br />
这不仅让人产生疑惑: &quot;自定义事件没有在父组件中被使用，这无疑是增加代码阅读的成本&quot;</p>
<p>这些疑惑可以通过<code>defineModel</code>宏来打消<br />
父组件还是一样的写法，只需子组件通过defineModel宏来处理，甚至不用defineProps来定义父组件传递的数据</p>
<pre><code class="language-vue">&lt;!-- src/App.vue --&gt;
&lt;script setup&gt;
import { ref } from 'vue'
import Counter from './components/Counter.vue'

const count = ref(0)
&lt;/script&gt;

&lt;template&gt;
  &lt;div&amp;gt;父组件：{{ count }}&lt;/div&gt;
  &lt;Counter v-model:count=&quot;count&quot;/&gt;
&lt;/template&gt;

</code></pre>
<pre><code class="language-vue">&lt;!-- src/components/Counter.vue --&gt;
&lt;script setup&gt;
const count = defineModel('count')

const handleClick = () =&gt; {
  count.value += 1
}
&lt;/script&gt;

&lt;template&gt;
  &lt;div&amp;gt;子组件：{{ count }}&lt;/div&gt;
  &lt;button @click=&quot;handleClick&quot;&gt;count+1&lt;/button&gt;
&lt;/template&gt;

</code></pre>
<p>defineModel宏目前还是实验性功能，不应该在生产环境中进行使用</p>
]]></content>
  <category term="JavaScript"/>
  <category term="Vue"/>
  <category term="前端"/>
  <category term="技术"/>
</entry>
<entry>
  <title>JavaScript闭包直接修改内部属性</title>
  <link href="https://ganto.me/post/20231117-3"/>
  <id>https://ganto.me/post/20231117-3</id>
  <updated>2023-11-17T00:00:00+08:00</updated>
  <published>2023-11-17T00:00:00+08:00</published>
  <author><name>干徒</name></author>
  <summary><![CDATA[事例代码 var o = (function() { var obj = { a: 1, b: 2, } return { get: function(k) { return obj[k] } } })() 说明 如上一段代码，在不改变原代码的情况下，修改obj对象中的a、b属性。 分析 代码使用了闭包，返回一个对象，对象中有一个get函数，这个get函数只能通过o.get('a')的方式查看obj中的属性 如果想要直接修改是无法修改的 所有对象都有一个原型链，该原型链继承自Object，Object上有一个valueOf属性，该属性为一个函数，执行可以返回对象自身 var o = (function() { var obj = { a: 1, b: 2, } return { get: function(k) { return obj[k] } } })() console.log(o.get('valueOf')) 如上代码，可以打印出来obj的valueOf结构了，直接执行console.log(o.get('valueOf')())，发现已经报错了，这里报错的原因是因为在执行v]]></summary>
  <content type="html"><![CDATA[<h2>事例代码</h2>
<pre><code class="language-js">var o = (function() {
    var obj = {
        a: 1,
        b: 2,
    }
    return {
        get: function(k) {
            return obj[k]
        }
    }
})()

</code></pre>
<h2>说明</h2>
<p>如上一段代码，在不改变原代码的情况下，修改obj对象中的a、b属性。</p>
<h2>分析</h2>
<p>代码使用了闭包，返回一个对象，对象中有一个get函数，这个get函数只能通过<code>o.get('a')</code>的方式查看obj中的属性<br />
如果想要直接修改是无法修改的</p>
<p>所有对象都有一个原型链，该原型链继承自Object，Object上有一个<code>valueOf</code>属性，该属性为一个函数，执行可以返回对象自身</p>
<pre><code class="language-js">var o = (function() {
    var obj = {
        a: 1,
        b: 2,
    }
    return {
        get: function(k) {
            return obj[k]
        }
    }
})()
console.log(o.get('valueOf'))

</code></pre>
<p>如上代码，可以打印出来obj的valueOf结构了，直接执行<code>console.log(o.get('valueOf')())</code>，发现已经报错了，这里报错的原因是因为在执行valueOf的this指向错误。</p>
<p>如下代码，演示this指向：</p>
<pre><code class="language-js">const obj = Object.prototype.valueOf
console.log(obj()) // 报错

const obj = Object.prototype.valueOf()
console.log(obj) // 可以获取Object对象

</code></pre>
<p>那么标志着这种方式行不通</p>
<h2>突破</h2>
<pre><code class="language-js">var o = (function() {
    var obj = {
        a: 1,
        b: 2,
    }
    return {
        get: function(k) {
            return obj[k]
        }
    }
})()

Object.defineProperty(Object.prototype, 'xxx', {
    get() {
        return this
    }
})

console.log(o.get('xxx'));

</code></pre>
<p>以上代码是在Object的原型上添加了一个xxx属性的访问器，因为是在Object的原型上，所以其他属性也可以读取xxx属性<br />
Object原型上的xxx属性的访问器，返回了this，这里的this是只要哪个对象访问这个属性，this就指向哪个对象，这样就解决了this指向的问题</p>
<p>当o.get('xxx')执行的时候，会触发o对象返回的get方法中返回的obj['xxx']，这里就相当于o中的obj访问了xxx属性，所以这里读取o.get('xxx')，但是obj身上没有xxx属性，就会读Object身上的xxx属性，就会触发xxx属性访问器中的get方法，那么this指向obj，也就是obj对象</p>
<p>在此时我们就可以修改obj属性值了</p>
<pre><code class="language-js">var o = (function() {
    var obj = {
        a: 1,
        b: 2,
    }
    return {
        get: function(k) {
            return obj[k]
        }
    }
})()

Object.defineProperty(Object.prototype, 'xxx', {
    get() {
        return this
    }
})
o.get('xxx').a = 100
o.get('xxx').b = 200
console.log(o.get('a'), o.get('b')); // 100 200

</code></pre>
<h2>如何避免这种情况</h2>
<h3>判断对象属性是否存在</h3>
<p>可以在读取obj的属性的时候加一个判断</p>
<pre><code class="language-js">var o = (function() {
    var obj = {
        a: 1,
        b: 2,
    }
    return {
        get: function(k) {
            if (obj.hasOwnProperty(k)) {
                return obj[k]
            }
            return undefined
        }
    }
})()

Object.defineProperty(Object.prototype, 'xxx', {
    get() {
        return this
    }
})
o.get('xxx').a = 100
o.get('xxx').b = 200
console.log(o.get('a'), o.get('b'));

</code></pre>
<p>这样处理后就无法读取xxx属性了，以为xxx属性不是obj身上存在的属性</p>
<h3>将对象原型设置为null</h3>
<pre><code class="language-js">var o = (function() {
    var obj = {
        a: 1,
        b: 2,
    }
    Object.setPrototypeOf(obj, null)
    return {
        get: function(k) {
            return obj[k]
        }
    }
})()

Object.defineProperty(Object.prototype, 'xxx', {
    get() {
        return this
    }
})
o.get('xxx').a = 100
o.get('xxx').b = 200
console.log(o.get('a'), o.get('b'));

</code></pre>
<p>这样obj就不存在原型了，无法去Object身上读取xxx属性</p>
]]></content>
  <category term="JavaScript"/>
  <category term="技术"/>
</entry>
</feed>